Once the cluster has been configured you are ready to deploy VMs on it. The cluster_vm Ansible module is present to manage virtual machines. It can be called from a playbook to perform actions on VMs. For instance, an example of playbook that creates a VM from a predefined image disk and XML Libvirt configuration would be:
- name: Create and start guest0
  cluster_vm:
    name: guest0
    command: create
    system_image: my_disk.qcow2
    xml: "{{ lookup('file', 'my_vm_config.xml', errors='strict') }}"
Playbooks can be executed in any hypervisor. Other playbook examples are stored in the example/playbooks/vm directory.
This section describes the VM architecture and the cluster_vm commands from a high-level point of view. Please read its documentation on Annex 1. cluster_vm module documentation for further information.
Note: Like other Ansible modules, the cluster_vm documentation can also be displayed by executing ansible-doc cluster_vm command from the Ansible root repository.
You will also find information on how to troubleshoot problems related to VM management on Annex 2. Troubleshooting VM management.
VM status
In the SEAPATH cluster the VMs can have several statuses:
- Undefined: The VM does not exist yet.
- Disabled: The VM exists and its data disk has been created, but it is not enabled to be used on the cluster.
- Starting: The VM is enabled and performing an operation of start.
- Started: The VM is enabled and started. Note: This doesn’t mean that the VM is ready and has finished booting, which can take some time.
- Stopping: The VM is enabled and performing a power-off action.
- Stopped: The VM is enabled and stopped.
- Failed: The VM is enabled, but it has failed to start.
VM architecture
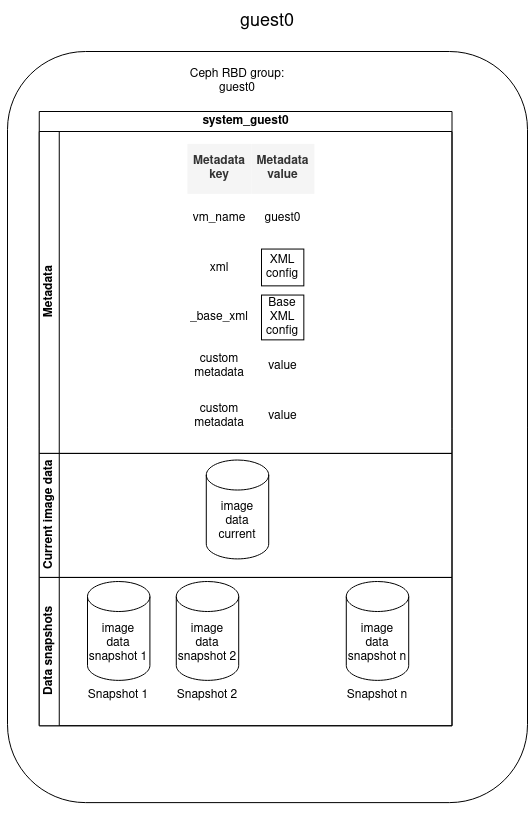
The diagram below describes how a VM is stored in the SEAPATH cluster. All non-volatile VM data is stored using Ceph, which is in charge of the maintenance of the data-store and data replication between all the hypervisors.
- VM is stored in a Ceph RBD group named as the VM name
- VM contains:
- Metadata
- Image data disk
- Image data snapshots
Metadata provides information associated with a VM. It consists of a list of pairs (key, value) that are set at the moment of the VM creation. You can define as many metadata fields as you want but some keys are reserved:
KEY | VALUE MEANING |
vm_name | VM name |
_base_xml | Initial Libvirt XML VM configuration |
xml | Libvirt XML file used for the VM configuration. It is autogenerated by modifying the _base_xml file. |
VM deployment
The VM data disk is set when creating a new VM or cloning an existing one, as described in the schemas below.
Create a VM
Create a VM from scratch by importing an image disk with the create command:
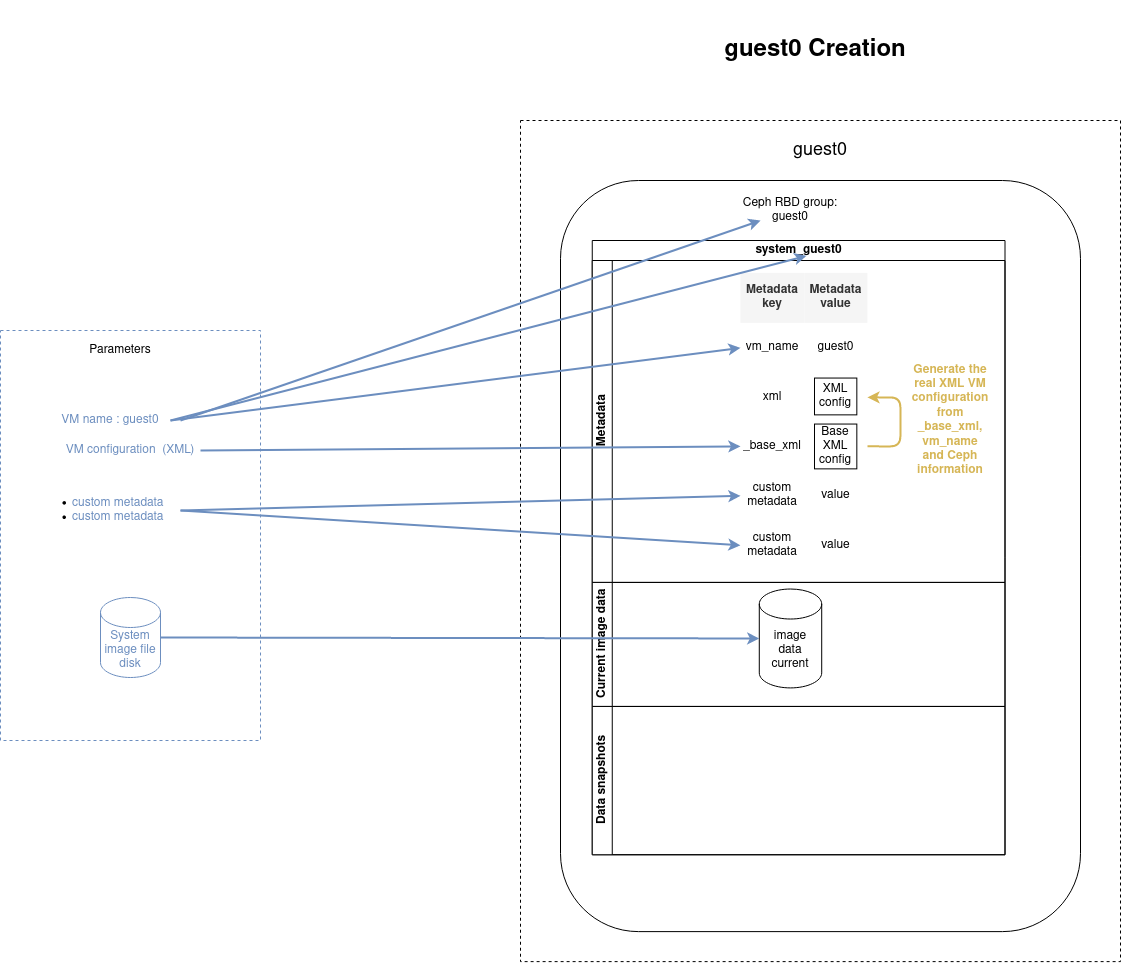
- name: Create and start guest0
  cluster_vm:
    name: guest0
    command: create
    system_image: my_disk.qcow2
    xml: "{{ lookup('file', 'my_vm_config.xml', errors='strict') }}"
Clone a VM
Copy an existing VM with the clone command:
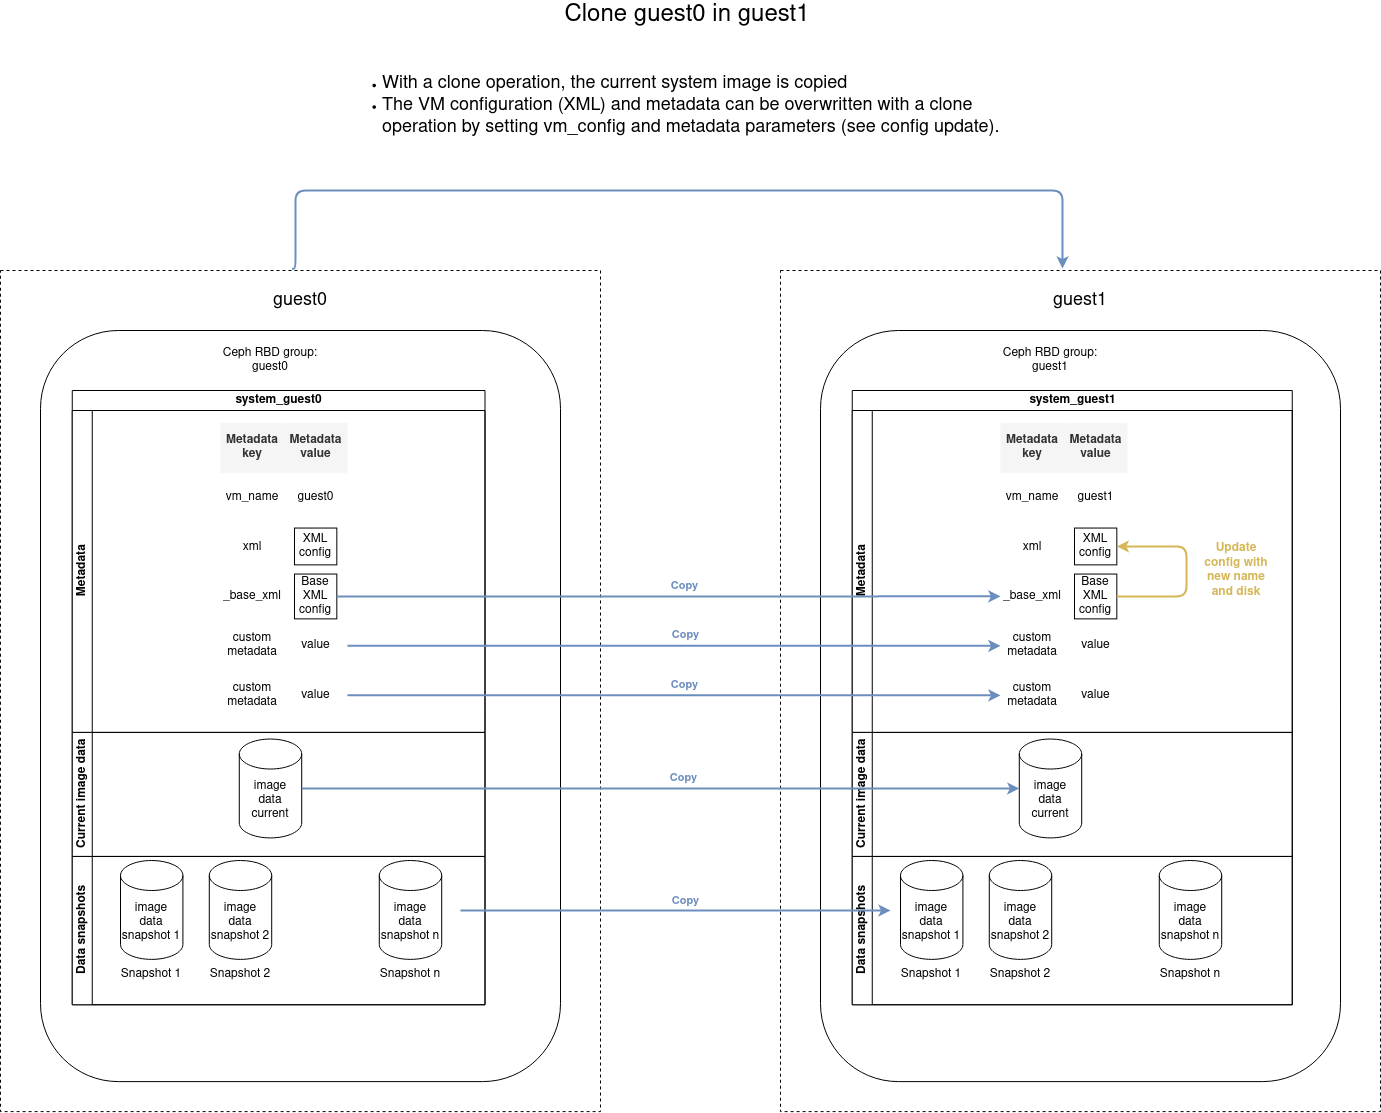
- name: Clone guest0 into guest1
  cluster_vm:
    name: guest1
    src_name: guest0
    command: clone
VM network configuration
The network configuration inside the VMs is done with the playbook file cluster_setup_network.yaml. You need to use an inventory that describes the VMs instead of the cluster as in the example vms_inventory_example.yaml file.
VM snapshots
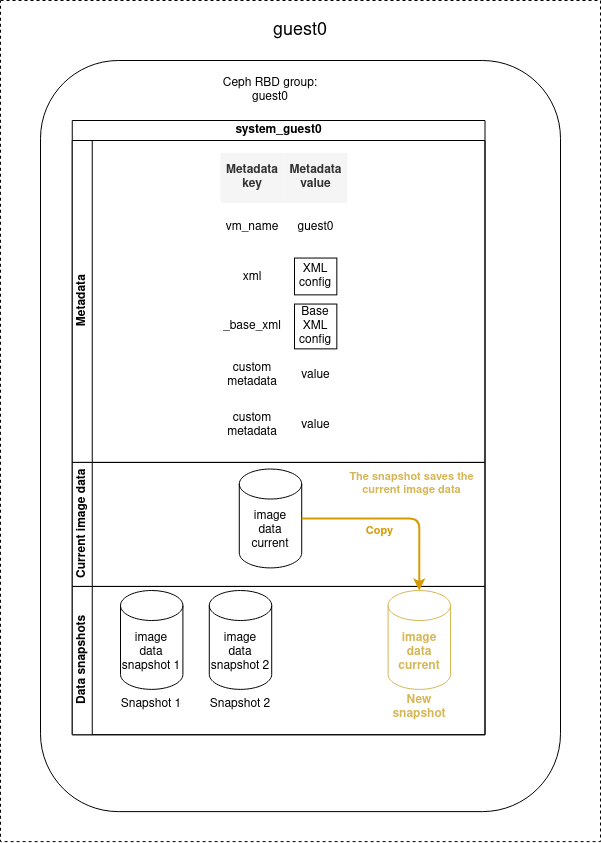
Disk snapshots can be used to save the disk image data at a given moment, that can be later recovered.
Snapshot creation
Snapshots can be created when the VM is stopped or running, but if you perform a snapshot when the VM is running, only the data written on the disk will be saved.
Volatile data such as the content of the RAM or the data not written on the disk will not be stored on the snapshot.
- name: Create a snapshot of guest0
  cluster_vm:
    name: guest0
    command: create_snapshot
    snapshot_name: snap1
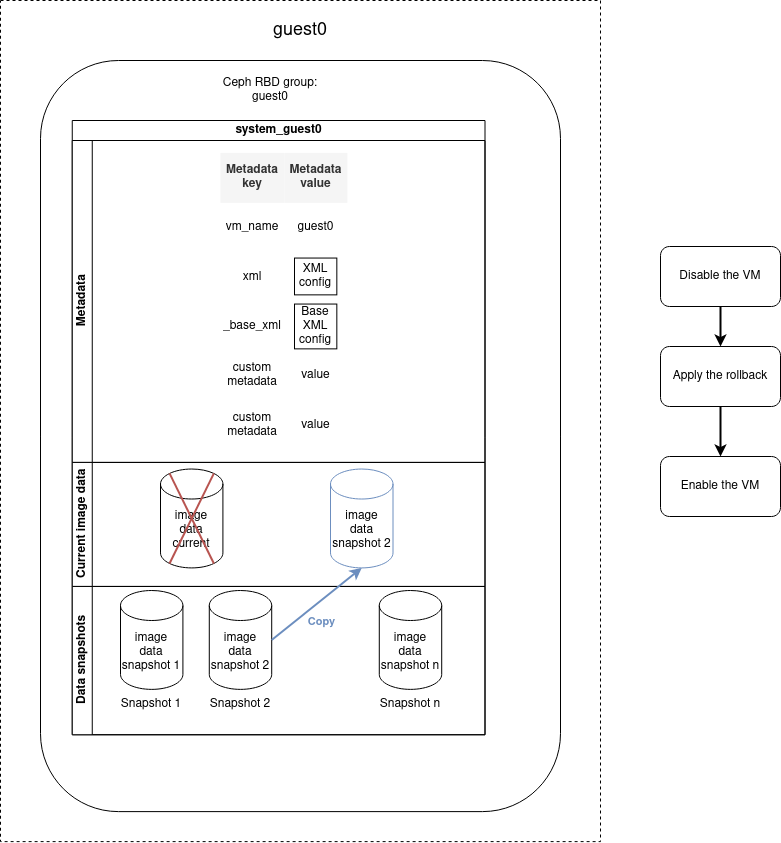
Snapshot rollback
You can restore the VM to a determined previous state by performing a rollback operation based on a snapshot. The data saved during the snapshot operation will be restored and replace the current disk image data. All current disk image data will be lost. The rollback operation does not remove the snapshot, it is possible to reuse the snapshot to re-apply a later rollback.
The rollback operation must be applied on a disabled machine. So if the VM is enabled, it will be automatically disabled before the rollback and re-enabled once the operation is finished.
- name: Rollback VM guest0 to snap0
  cluster_vm:
    name: guest0
    command: rollback_snapshot
    snapshot_name: snap0
Other snapshot operations
With the cluster_vm module it is also possible to:
- List all snapshots
- Remove a particular snapshot
- Remove multiple snapshots by purging:
- All of them
- The n oldest one
- The oldest ones to a specific date
An example playbook that removes the snapshots created before a determined date would be:
# Example - Remove old snapshots
- name: Remove snapshots of guest0 older than January 24th 2021 8:00 AM
  cluster_vm:
    name: guest0
    command: purge_image
    purge_date:
      date: '2021-01-24'
      time: '08:00'
The purge operation can be performed regularly to avoid over space. This can be easily done with a tool like Ansible Tower or AWX.
Update a VM
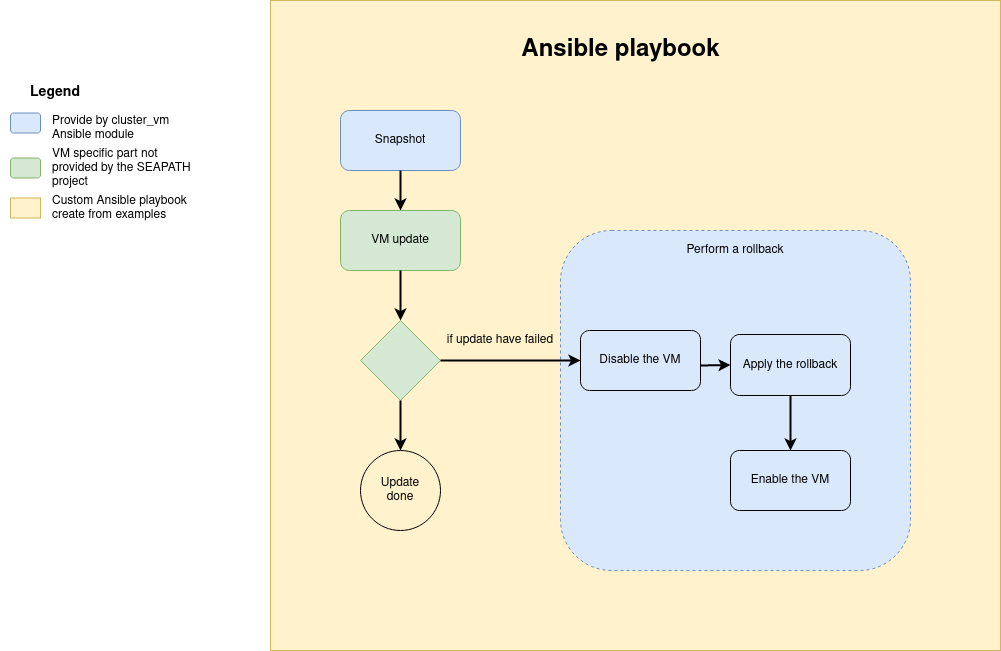
Updating the VM data inside the VM
Updating the VM data cannot be performed by the cluster_vm module, but you can use its snapshot system to cancel the update in case of error as described in the diagram below. To achieve this, you can base your playbook on the update skeleton example.
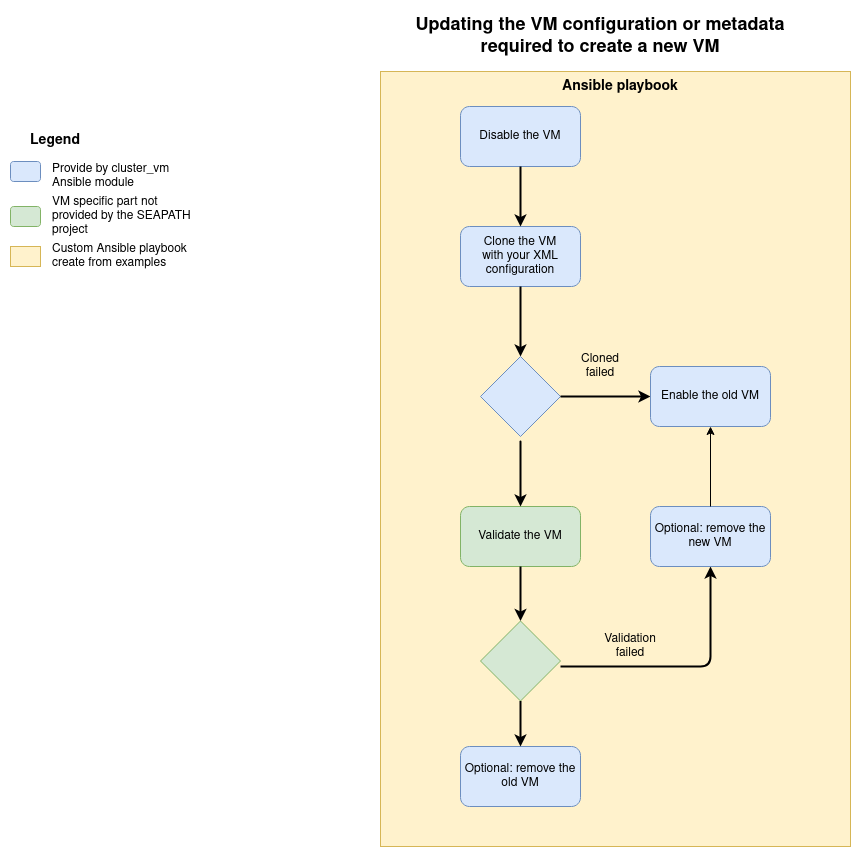
Updating VM configuration or metadata
The VM configuration and metadata are immutable. To change them, you must create a new VM from the existing one with the clone command.
The file update configuration example can help you to create a playbook to achieve this operation according to the following diagram.