| Status | INCUBATION |
| Description |
Draft Roadmap
Test proposal
The following document describes the test cases which must meet the following objectives:
Ensuring the hardware meets the required performance for substation grade protection regarding latency, jitter, interoperability and reliability
Ensuring the software platform meets the required performance for substation grade protection regarding latency, jitter, interoperability and reliability
Provide system characteristics/benchmarks
Provide indications on scalability
Documentation
The documentation is available directly on github.
Here is the main documentation to build a SEAPATH image: https://github.com/seapath/yocto-bsp/blob/master/README.adoc
Build machine
The Yocto project requires a powerful Linux based machine.
In order to build efficiently the SEAPATH project, we recommend not to use Virtual Machine. The Yocto project will ensure to multi-thread your build, so try to use a build machine with many CPU cores.
Here is a discussion on the Yocto Project mailing list: https://lists.yoctoproject.org/g/yocto/topic/72047879#48815
Here is for instance, a build configuration (~1500 euros) used:
CPU | AMD RYZEN 9 3900X WRAITH PRISM LED RGB (3.8 GHZ / 4.6 GHZ) |
Cooling | NOCTUA NH-U14S |
MotherBoard | ASUS PRIME X570-P |
Chipset | Intel C612 |
PowerSupply | SEASONIC PRIME ULTRA 650 W GOLD |
RAM | G.SKILL FLARE X SERIES 32 GO (2 X 16 GO) DDR4 3200 MHZ CL14 |
SSD (SATA) | SAMSUNG SSD 860 EVO 500 GO |
SSD (NVME) | CORSAIR FORCE MP600 1 TO |
GPU | ASUS RADEON R7 240 R7240-2GD3-L |
Case | PHANTEKS ENTHOO PRO |
Tips for building
About 250GB is needed for building SEAPATH.
A USB attached storage may be too slow to be practical for a successful build.
Ensure you use an ext 2/ ext3 / ext4 filesystem for the build directory. NTFS will not work.
Watch out with only manually deleting the /tmp/work directory. Instead delete the whole tmp directory.
When deleting the tmp, it may take a very long time, and might cause
rm -rfto fail with an error.find . -deletewill work better, as it will not try to index all files before deleting them.
Test Bench/Reference hardware
This is the reference hardware for the Seapath project and supported out of the box. It might cost significant time to support other hardware (e.g. AMD processors). Some integration is available with a dedicated Yocto layer: https://git.yoctoproject.org/cgit/cgit.cgi/meta-amd/
Specification
Parts | Specifications |
|---|---|
Motherboard | ASMB‐823 |
Chipset | Intel C612 |
CPU | XEON 2.4G 35M 2011P 14CORE E5‐2680V4 |
Memory | 2x 8G R‐DDR4‐2400 1.2V1GX8 HYX |
Disk | SQF 2.5 SATA SSD 830 512G MLC (‐40~85°C) |
NIC | INTEL I210 NIC 10/100/1000M PCIEx4 2PORT(G) |
Tests results
Real time
Tests
With the previous test bench hardware, a couple of tests were used.
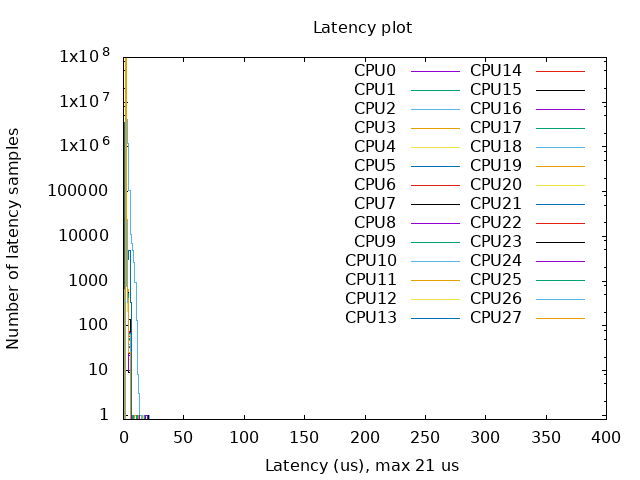
We used cyclictest:
"Cyclictest accurately and repeatedly measures the difference between a thread's intended wake-up time and the time at which it actually wakes up in order to provide statistics about the system's latencies. It can measure latencies in real-time systems caused by the hardware, the firmware, and the operating system." (source: https://wiki.linuxfoundation.org/realtime/documentation/howto/tools/cyclictest/start).
The following arguments were provided:
cyclictest -l100000000 -m -Sp90 -i200 -h400 -q >output
This test is very long (~5 hours).
You can then plot the latency graph:
./yocto-bsp/tools/gen_cyclic_test.sh -i output -n 28 -o output.png
output is the output file generated by cyclictest
28 match the amount of CPU used.
output.png is the latency graph file.
Note:
we used the same arguments than used by OSADL (https://www.osadl.org/Latency-plots.latency-plots.0.html)
We created a script to plot the latency graph as done by OSADL
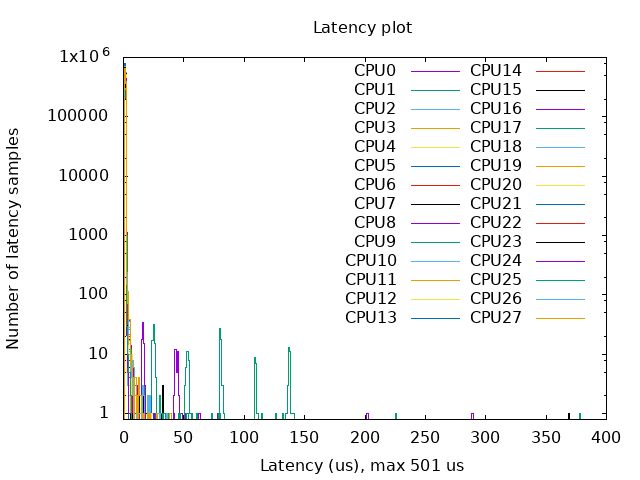
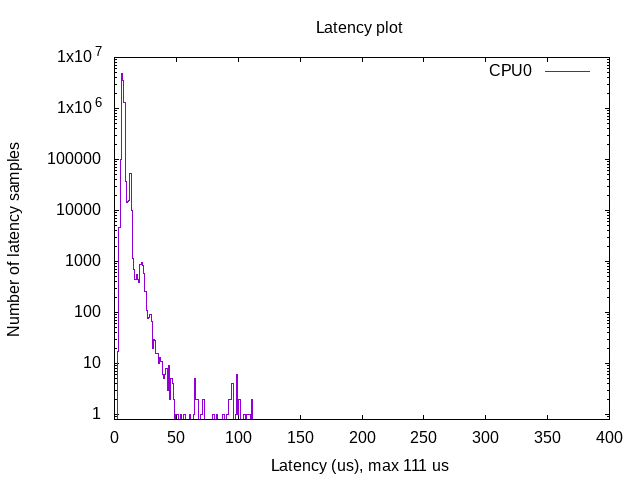
Results
Hypervisors
With Kernel RT Full Preempt (CONFIG_PREEMPT_RT_FULL=y)
Without Kernel RT Full Preempt (CONFIG_PREEMPT_NONE=y)
Virtual machines
All Yocto images include the ability to run guest Virtual Machines (VMs).
We used KVM and Qemu to run them. As we do not have any window manager on the host system,
VMs should be launched in console mode and their console output must be correctly set.
For testing purpose, we can run our Yocto image as a guest machine.
We do not use the .wic image which includes the Linux Kernel and the rootfs because
we need to set the console output.
We use two distinct files to modify the Linux Kernel command line:
- bzImage: the Linux Kernel image
- seapath-test-image-votp.ext4: the rte rootfs
Then run:
qemu-system-x86_64 -accel kvm -kernel bzImage -m 4096 -hda seapath-test-image-votp.ext4 -nographic -append 'root=/dev/sda console=ttyS0'
Docker
You can use docker check-config.sh to check that all necessary configurations of the host linux Kernel are set:
info: reading kernel config from /proc/config.gz ...

Generally Necessary:
- cgroup hierarchy: properly mounted [/sys/fs/cgroup]
- CONFIG_NAMESPACES: enabled
- CONFIG_NET_NS: enabled
- CONFIG_PID_NS: enabled
- CONFIG_IPC_NS: enabled
- CONFIG_UTS_NS: enabled
- CONFIG_CGROUPS: enabled
- CONFIG_CGROUP_CPUACCT: enabled
- CONFIG_CGROUP_DEVICE: enabled
- CONFIG_CGROUP_FREEZER: enabled
- CONFIG_CGROUP_SCHED: enabled
- CONFIG_CPUSETS: enabled
- CONFIG_MEMCG: enabled
- CONFIG_KEYS: enabled
- CONFIG_VETH: enabled
- CONFIG_BRIDGE: enabled
- CONFIG_BRIDGE_NETFILTER: enabled
- CONFIG_NF_NAT_IPV4: enabled
- CONFIG_IP_NF_FILTER: enabled
- CONFIG_IP_NF_TARGET_MASQUERADE: enabled
- CONFIG_NETFILTER_XT_MATCH_ADDRTYPE: enabled
- CONFIG_NETFILTER_XT_MATCH_CONNTRACK: enabled
- CONFIG_NETFILTER_XT_MATCH_IPVS: enabled
- CONFIG_IP_NF_NAT: enabled
- CONFIG_NF_NAT: enabled
- CONFIG_NF_NAT_NEEDED: enabled
- CONFIG_POSIX_MQUEUE: enabled

Optional Features:
- CONFIG_USER_NS: enabled
- CONFIG_SECCOMP: enabled
- CONFIG_CGROUP_PIDS: enabled
- CONFIG_MEMCG_SWAP: enabled
- CONFIG_MEMCG_SWAP_ENABLED: enabled
    (cgroup swap accounting is currently enabled)
- CONFIG_LEGACY_VSYSCALL_EMULATE: enabled
- CONFIG_BLK_CGROUP: enabled
- CONFIG_BLK_DEV_THROTTLING: enabled
- CONFIG_IOSCHED_CFQ: enabled
- CONFIG_CFQ_GROUP_IOSCHED: enabled
- CONFIG_CGROUP_PERF: enabled
- CONFIG_CGROUP_HUGETLB: enabled
- CONFIG_NET_CLS_CGROUP: enabled
- CONFIG_CGROUP_NET_PRIO: enabled
- CONFIG_CFS_BANDWIDTH: enabled
- CONFIG_FAIR_GROUP_SCHED: enabled
- CONFIG_RT_GROUP_SCHED: missing
- CONFIG_IP_NF_TARGET_REDIRECT: enabled
- CONFIG_IP_VS: enabled
- CONFIG_IP_VS_NFCT: enabled
- CONFIG_IP_VS_PROTO_TCP: enabled
- CONFIG_IP_VS_PROTO_UDP: enabled
- CONFIG_IP_VS_RR: enabled
- CONFIG_EXT4_FS: enabled
- CONFIG_EXT4_FS_POSIX_ACL: enabled
- CONFIG_EXT4_FS_SECURITY: enabled
- Network Drivers:
  - "overlay":
    - CONFIG_VXLAN: enabled
      Optional (for encrypted networks):
      - CONFIG_CRYPTO: enabled
      - CONFIG_CRYPTO_AEAD: enabled
      - CONFIG_CRYPTO_GCM: missing
      - CONFIG_CRYPTO_SEQIV: missing
      - CONFIG_CRYPTO_GHASH: missing
      - CONFIG_XFRM: enabled
      - CONFIG_XFRM_USER: enabled
      - CONFIG_XFRM_ALGO: enabled
      - CONFIG_INET_ESP: missing
      - CONFIG_INET_XFRM_MODE_TRANSPORT: missing
  - "ipvlan":
    - CONFIG_IPVLAN: enabled
  - "macvlan":
    - CONFIG_MACVLAN: enabled
    - CONFIG_DUMMY: missing
  - "ftp,tftp client in container":
    - CONFIG_NF_NAT_FTP: enabled
    - CONFIG_NF_CONNTRACK_FTP: enabled
    - CONFIG_NF_NAT_TFTP: missing
    - CONFIG_NF_CONNTRACK_TFTP: missing
- Storage Drivers:
  - "aufs":
    - CONFIG_AUFS_FS: missing
  - "btrfs":
    - CONFIG_BTRFS_FS: missing
    - CONFIG_BTRFS_FS_POSIX_ACL: missing
  - "devicemapper":
    - CONFIG_BLK_DEV_DM: enabled
    - CONFIG_DM_THIN_PROVISIONING: missing
  - "overlay":
    - CONFIG_OVERLAY_FS: missing
  - "zfs":
    - /dev/zfs: missing
    - zfs command: missing
    - zpool command: missing

Limits:
- /proc/sys/kernel/keys/root_maxkeys: 1000000
Contribution process
Create a personal fork of the project on Github
Clone the fork on your local machine
Make sure to pull upstream changes into your local repository
Implement/fix your feature, comment your code if needed
Follow the code style of the project, including indentation
Run tests on the hardware you want to install the distribution and ensure that no regression are seen (ex: cukinia)
Provide the hardware specification
Write or adapt tests as needed
Add or change the documentation as needed.
Squash intermediary commits (fixes, WIP, …) with git's interactive rebase.
Make sure to split your commit
Each commit should only add one feature
Use two separate commits when adding a package and enabling it
Make sure that your commit message is consistent with the git history
Prefix the commit title by the area touch
ex: images/seapath-host-common.inc: add STONITH plugins
Separate subject from body with a blank line
Limit the subject line to 50 characters
Use the imperative mood in the subject line
Wrap the body at 72 characters
Use the body to explain what and why vs. how
More details can be found there.
Sign off your commit
Push your branch to your fork on Github
From your fork open a pull request