| Status |
| ||||||||
| Description |
| Table of Contents |
|---|
What is SEAPATH?
Due to the Energy Transition, the use of power transmission and distribution grids is changing. The control architecture of power grids needs to be swiftly adapted to take account of infeed at lower grid levels, higher dynamics in flow patterns, and more distributed controls (both internal controls and grid flexibility services from third parties). In this context, TSOs and DSOs require a new generation of Digital Substation Automation Systems (DSAS) that could provide more complex, dynamic, and adaptative automation functions at grid nodes and edge, as well as enhanced orchestration from central systems, in both flexible and scalable manner. Virtualization is seen as a key innovation in order to fulfill these needs.
SEAPATH, Software Enabled Automation Platform and Artifacts (THerein), aims at developing a “reference design” and “industrial grade” open source real-time platform that can run virtualized automation and protection applications (for the power grid industry in the first place and potentially beyond). This platform is intended to host multi-provider applications.
Due to the nature of the virtualized applications, whose function is to regulate, control, command and transmit information relating to the operation, management and maintenance of an electrical substation, the virtualization base must meet the challenges of reliability, performance and availability.
Features
- Hosting of virtualization systems: an heterogeneous variety of virtual machines can be installed and managed on the platform.
- High availability and clustering: machines on the cluster are externally monitored in order to guarantee the high availability in case of hardware or software failures.
- Distributed storage: data and disk images from the virtual machines are replicated and synchronized in order to guarantee its integrity and availability on the cluster.
- Intelligent virtual network: the virtualisation platform is capable of configuring and managing the network traffic in a data layer level.
- Administration: system can be easily configured and managed from a remote machine connected to the network as well as by an administrator on site.
- Automatic update: the virtualisation platform can be automatically updated from a remote server.
SEAPATH architecture
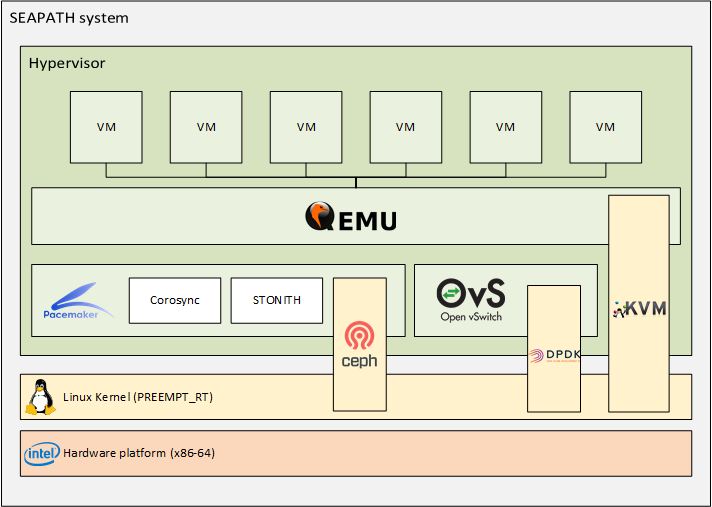
The virtualisation platform uses the following open source tools:
- QEMU: Emulator and virtualizer that can perform hardware virtualization.
- KVM: Linux module that offers virtualization extensions so the machine is capable of functioning as a hypervisor.
- Pacemaker: High availability resource manager that offers clustering functionalities. It is used in combination with its plugins Corosync + STONITH.
- Ceph: Scalable distributed-storage tool that offers persistent storage within a cluster.
- Open vSwitch: Multilayer virtual switch designed to manage massive network automation in virtualization environments.
- DPDK: Set of libraries that provide a standard programming interface for packet processing on network function virtualisation and advanced network switching. This package is optional, it offers an optimized processing of the network packages at the cost of a hardware dependency (NIC must be DPDK compatible).
A Yocto distribution
The Yocto Project is a Linux Foundation collaborative open source project whose goal is to produce tools and processes that enable the creation of Linux distributions for embedded and IoT software that are independent of the underlying architecture of the embedded hardware.
The Yocto Project provides interoperable tools, metadata, and processes that enable the rapid, repeatable development of Linux-based embedded systems in which every aspect of the development process can be customized.
The Layer Model simultaneously supports collaboration and customization. Layers are repositories that contain related sets of instructions that tell the OpenEmbedded build system what to do. You can collaborate, share, and reuse layers.
Layers can contain changes to previous instructions or settings at any time. This powerful override capability is what allows you to customize previously supplied collaborative or community layers to suit your product requirements.
How is high availability ensured in the cluster?
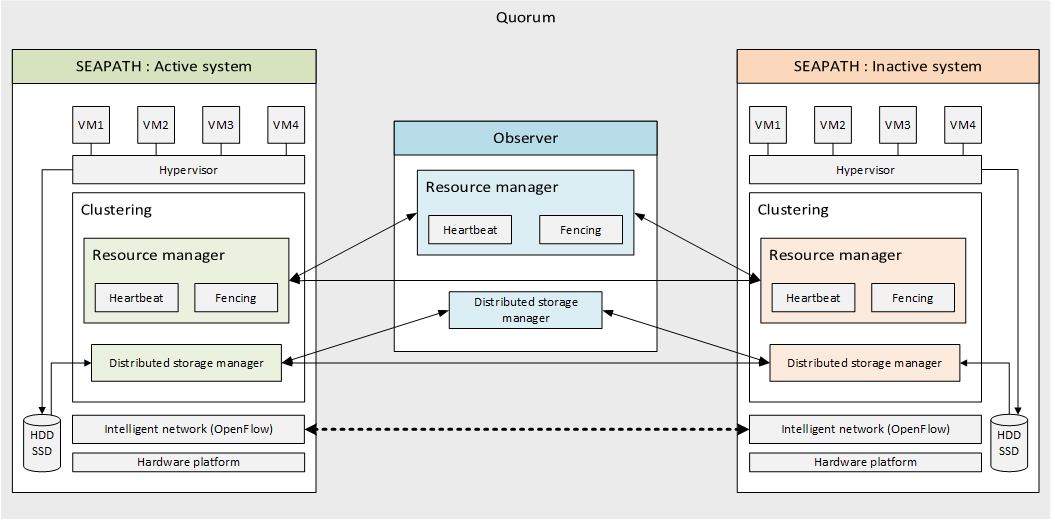
- Resource management: communication between the different machines within a group is managed by Pacemaker and two of its plugins. Corosync is used for the intercluster communication and the Heartbeat mechanism while STONITH implements the fencing system.
- Distributed storage: All data written to disks is replicated and synchronised within the group members by using the CEPH tool. Note that from a user point of view only a single instance of each VM can be started on the system at the same time.
- Intelligent network: The different machines on the cluster are connected on the layer level (OSI model) using OpenVSwitch and DPDK for its administration and management.
SEAPATH and cybersecurity
SEAPATH follows the applicable cybersecurity guidelines defined by the ANSSI in the DAT-NT-28/ANSSI/SDE/NP document . Several mechanisms have been taken into account in order to guarantee system’s security:
- System hardening
- Disk encryption
- Secrets storage and protection
- Process isolation
- Privileges management policy
- Connection encryption
- User authentication process
SEAPATH and Real-time
SEAPATH uses a full preemptable Linux Kernel which brings real-time features.
cyclictest tool is used to accurately and repeatedly measure the difference between a thread's intended wake-up time and the time at which it actually wakes up in order to provide statistics about the system's latencies. It can measure latencies in real-time systems caused by the hardware, the firmware, and the operating system. Note that the preemptable Linux Kernel is not enough to guarantee real-time performance of the guests. Real-time applications, network configuration and so on, must also be designed carefully.
The result and analysis of Real-time tests performed on a SEAPATH cluster can be found in section RT test results.
How to use SEAPATH
This section describes how to build and configure a minimal cluster to use the SEAPATH project. The following tools are used during the process:
- Ansible: automation tool that handles remote configuration and management by using SSH protocol. Ansible is based on files named playbooks that contain the list of actions to be performed and inventories that define the list of machines in which the tasks should be run.
- CQFD: tool that permits running commands within a predefined Docker container while keeping the generated output on the current host machine. This is a convenient way to automate tasks such as the firmware build process without need to install the tools on the host machine.
- Cukinia: lightweight and extensible testing tool that offers the automation and integration of tests in order to validate the functionalities developed during the lifecycle of a Linux embedded system.
Prepare the machines
As described above, the SEAPATH minimal cluster requires three machines, two cluster machines (or hypervisors) and an observer. The steps to build and flash the Yocto images for the cluster machines are described in SEAPATH Yocto BSP.
Interact with the cluster with Ansible
Once the machines have been flashed with the corresponding SEAPATH Yocto images, the cluster can be configured by using the Ansible tool. You can follow the procedure described on SEAPATH Ansible to deploy the cluster or create your own Ansible playbooks.
As described on the previous link, the different configuration and setup tasks to configure the cluster have been gathered on a single playbook, so it is enough to execute:
| Code Block | ||
|---|---|---|
| ||
ansible-playbook -i inventories/cluster_inventory.yaml playbooks/cluster_setup_main.yaml |
Attention: While executing this playbook it is necessary to remove the media (USB key) that contains the SEAPATH Yocto images once they have been flashed on the disk. Please remove your USB when the Ansible message "Wait for all cluster machines to be online" appears.
Virtual machine management
Once the cluster has been configured you are ready to deploy VMs on it. The cluster_vm Ansible module is present to manage virtual machines. It can be called from a playbook to perform actions on VMs. For instance, an example of playbook that creates a VM from a predefined image disk and XML Libvirt configuration would be:
| Code Block | ||
|---|---|---|
| ||
- name: Create and start guest0
  cluster_vm:
    name: guest0
    command: create
    system_image: my_disk.qcow2
    xml: "{{ lookup('file', 'my_vm_config.xml', errors='strict') }}"
|
Playbooks can be executed in any hypervisor. Other playbook examples are stored in the example/playbooks/vm directory.
This section describes the VM architecture and the cluster_vm commands from a high-level point of view. Please read its documentation on Annex 1. cluster_vm module documentation for further information.
Note: Like other Ansible modules, the cluster_vm documentation can also be displayed by executing ansible-doc cluster_vm command from the Ansible root repository.
You will also find information on how to troubleshoot problems related to VM management on Annex 2. Troubleshooting VM management.
VM status
In the SEAPATH cluster the VMs can have several statuses:
- Undefined: The VM does not exist yet.
- Disabled: The VM exists and its data disk has been created, but itis not enabled to be used on the cluster.
- Starting: The VM is enabled and performing an operation of start.
- Started: The VM is enabled and started. Note: This doesn’t mean that the VM is ready and has finished booting, which can take some time.
- Stopping: The VM is enabled and performing a power-off action.
- Stopped: The VM is enabled and stopped.
- Failed: The VM is enabled, but it has failed to start.
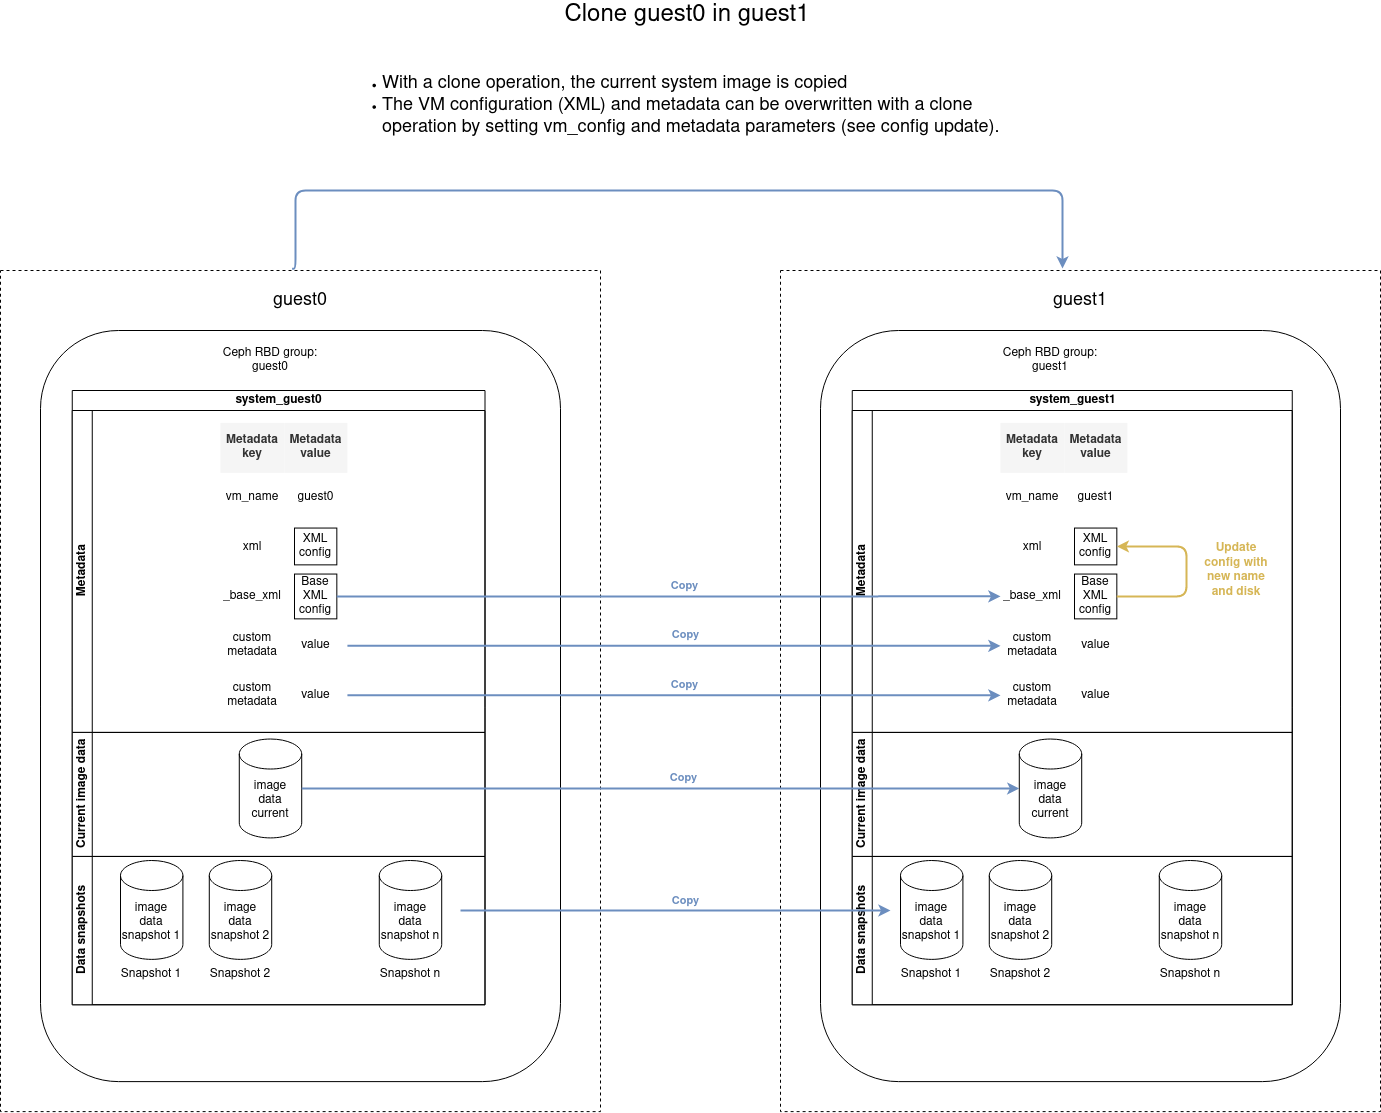
VM architecture
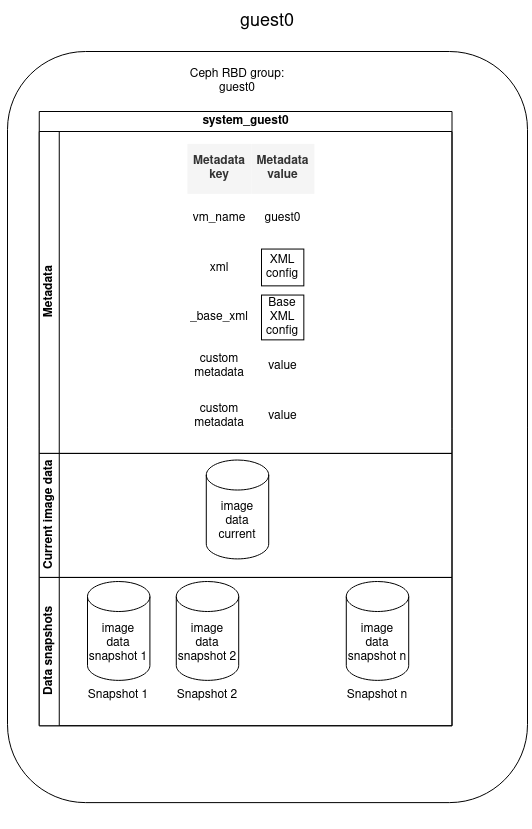
The diagram below describes how a VM is stored in the SEAPATH cluster. All non-volatile VM data is stored using Ceph, which is in charge of the maintenance of the data-store and data replication between all the hypervisors.
- VM is stored in a Ceph RBD group named as the VM name
- VM contains:
- Metadata
- Image data disk
- Image data snapshots
Metadata provides information associated with a VM. It consists of a list of pairs (key, value) that are set at the moment of the VM creation. You can define as many metadata fields as you want but some keys are reserved:
KEY | VALUE MEANING |
vm_name | VM name |
_base_xml | Initial Libvirt XML VM configuration |
xml | Libvirt XML file used for the VM configuration. It is autogenerated by modifying the _base_xml file. |
VM deployment
The VM data disk is set when creating a new VM or cloning an existing one, as described in the schemas below.
Create a VM
Create a VM from scratch by importing an image disk with the create command:
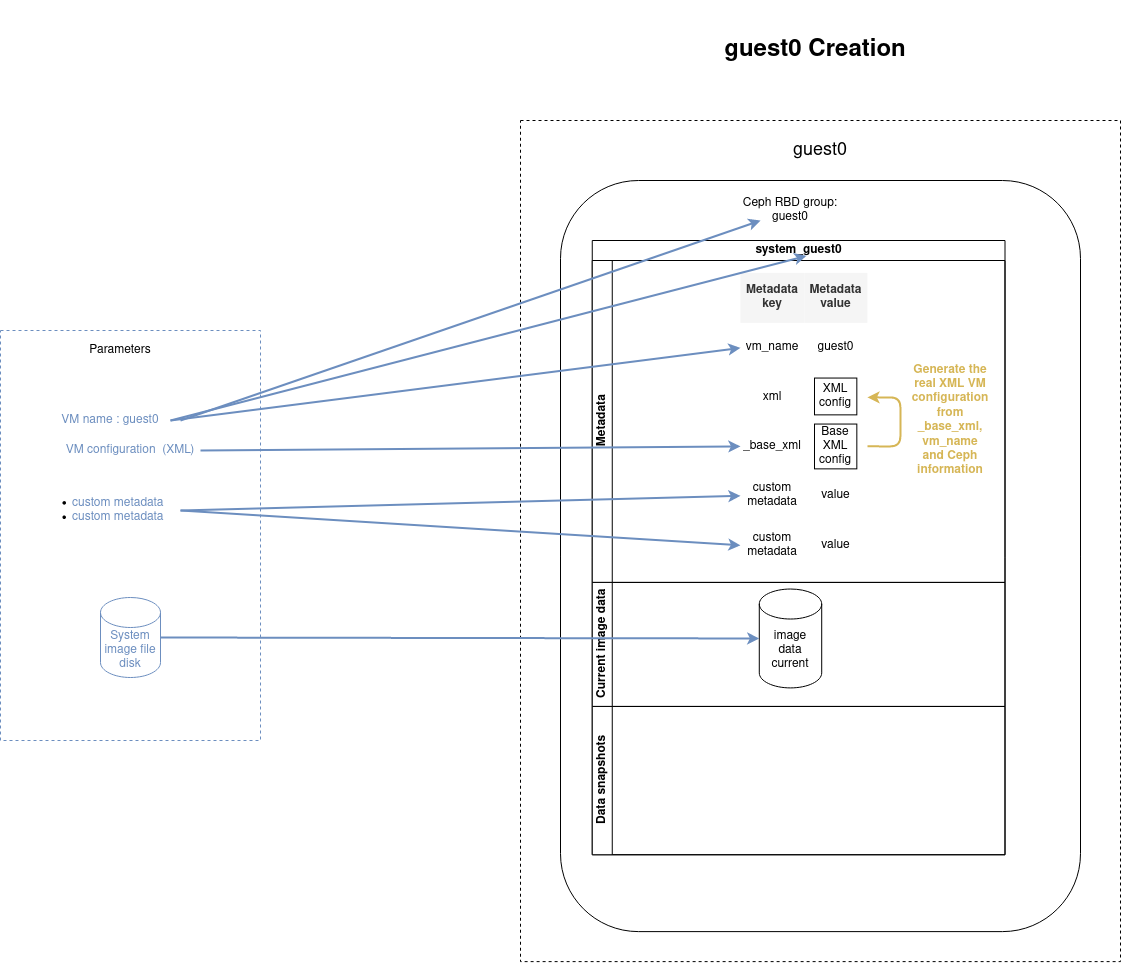
| Code Block | ||
|---|---|---|
| ||
- name: Create and start guest0
  cluster_vm:
    name: guest0
    command: create
    system_image: my_disk.qcow2
    xml: "{{ lookup('file', 'my_vm_config.xml', errors='strict') }}"
|
Clone a VM
Copy an existing VM with the clone command:
| Code Block | ||
|---|---|---|
| ||
- name: Clone guest0 into guest1
  cluster_vm:
    name: guest1
    src_name: guest0
    command: clone
|
VM network configuration
The network configuration inside the VMs is done with the playbook file cluster_setup_network.yaml. You need to use an inventory that describes the VMs instead of the cluster as in the example vms_inventory_example.yaml file.
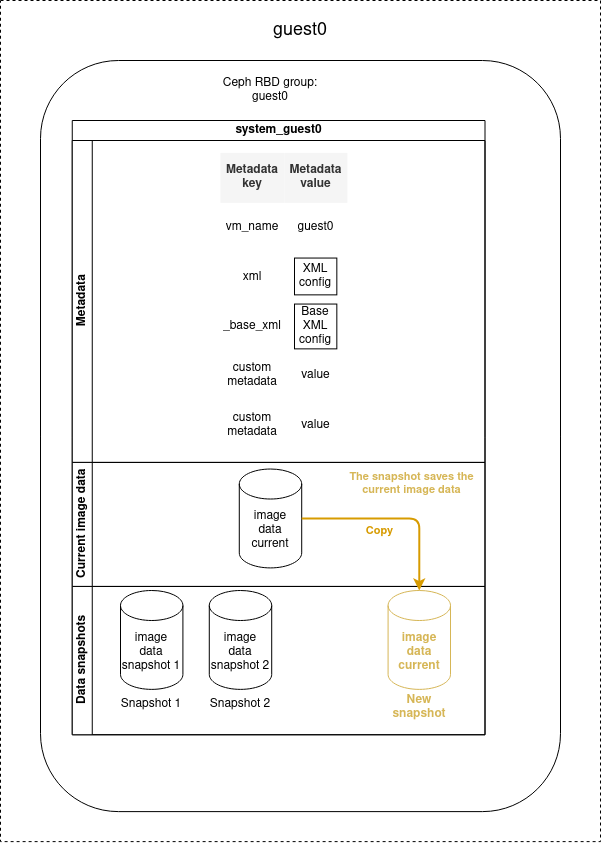
VM snapshots
Disk snapshots can be used to save the disk image data at a given moment, that can be later recovered.
Snapshot creation
Snapshots can be created when the VM is stopped or running, but if you perform a snapshot when the VM is running, only the data written on the disk will be saved.
| Info |
|---|
Volatile data such as the content of the RAM or the data not written on the disk will not be stored on the snapshot. |
| Code Block | ||
|---|---|---|
| ||
- name: Create a snapshot of guest0
  cluster_vm:
    name: guest0
    command: create_snapshot
    snapshot_name: snap1
|
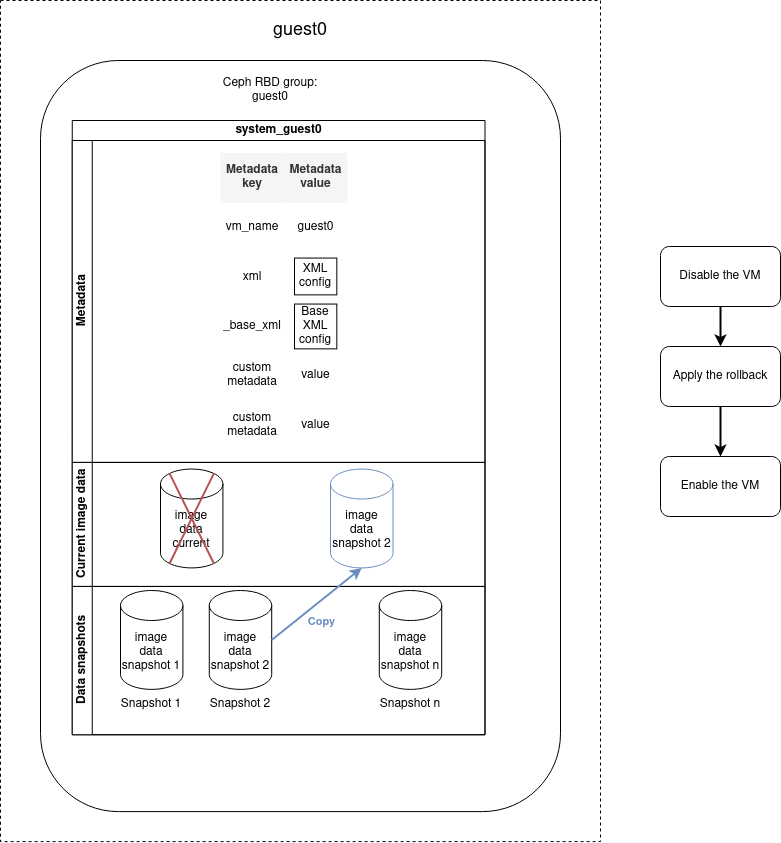
Snapshot rollback
You can restore the VM to a determined previous state by performing a rollback operation based on a snapshot. The data saved during the snapshot operation will be restored and replace the current disk image data. All current disk image data will be lost. The rollback operation does not remove the snapshot, it is possible to reuse the snapshot to re-apply a later rollback.
The rollback operation must be applied on a disabled machine. So if the VM is enabled, it will be automatically disabled before the rollback and re-enabled once the operation is finished.
| Code Block | ||
|---|---|---|
| ||
- name: Rollback VM guest0 to snap0
  cluster_vm:
    name: guest0
    command: rollback_snapshot
    snapshot_name: snap0
|
Other snapshot operations
With the cluster_vm module it is also possible to:
- List all snapshots
- Remove a particular snapshot
- Remove multiple snapshots by purging:
- All of them
- The n oldest one
- The oldest ones to a specific date
An example playbook that removes the snapshots created before a determined date would be:
| Code Block | ||
|---|---|---|
| ||
# Example - Remove old snapshots
- name: Remove snapshots of guest0 older than January 24th 2021 8:00 AM
  cluster_vm:
    name: guest0
    command: purge_image
    purge_date:
      date: '2021-01-24'
      time: '08:00'
|
The purge operation can be performed regularly to avoid over space. This can be easily done with a tool like Ansible Tower or AWX.
Update a VM
Updating the VM data inside the VM
Updating the VM data cannot be performed by the cluster_vm module, but you can use its snapshot system to cancel the update in case of error as described in the diagram below. To achieve this, you can base your playbook on the update skeleton example.
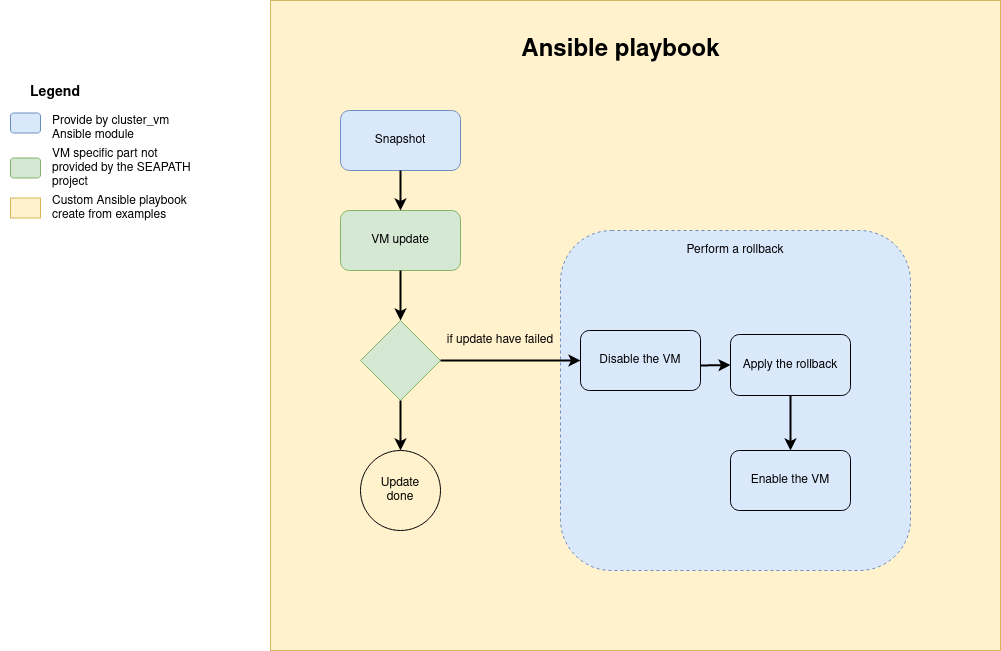
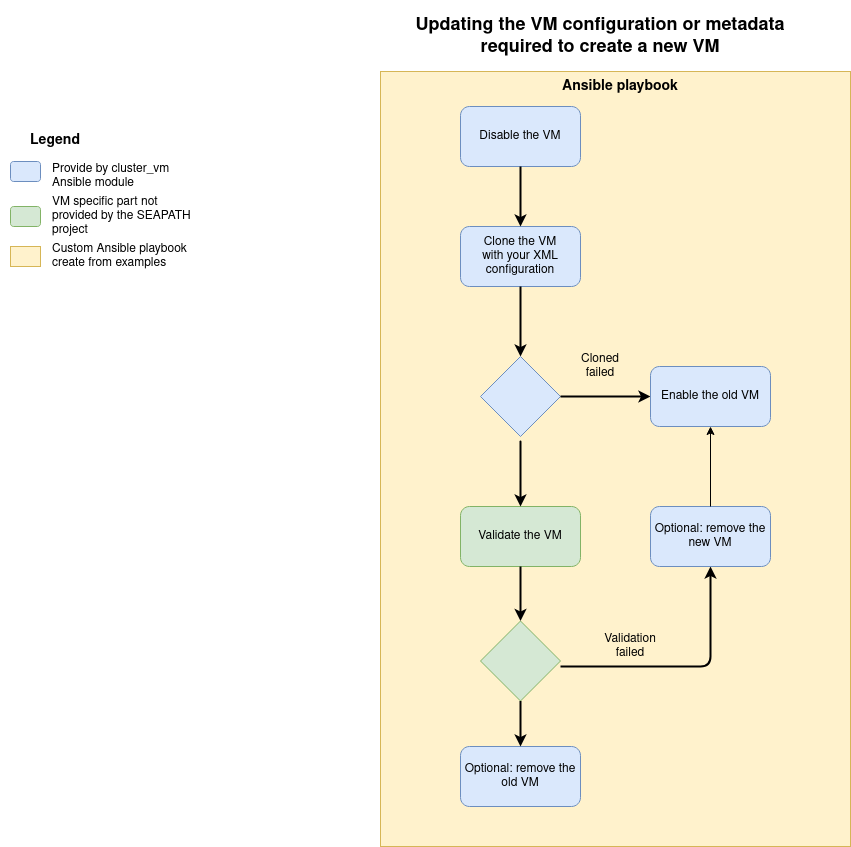
Updating VM configuration or metadata
The VM configuration and metadata are immutable. To change them, you must create a new VM from the existing one with the clone command.
The file update configuration example can help you to create a playbook to achieve this operation according to the following diagram.
Continuous integration on SEAPATH
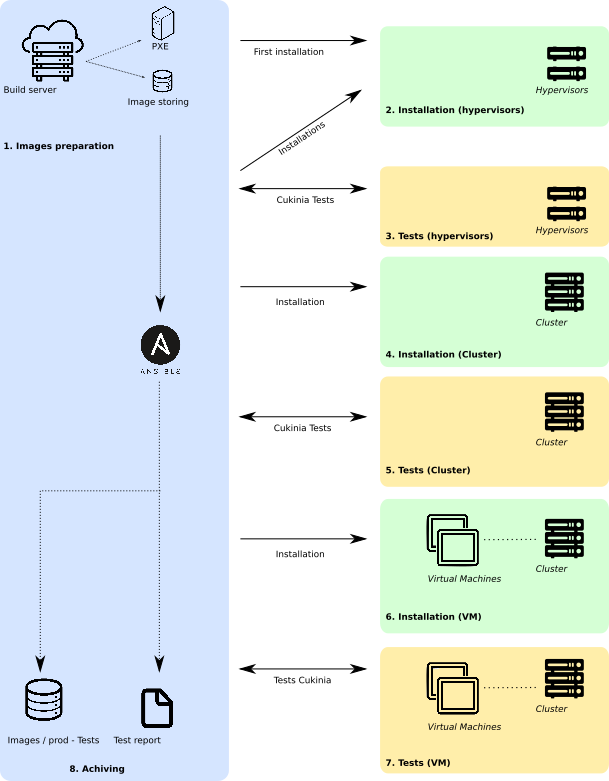
A continuous integration (CI) process has been implemented in order to build and deploy a custom cluster and automatise the periodical validation of the development. Source code can be found in https://github.com/seapath/ci.
The CI is based on a Jenkins server that has been completely dockerized in order to guarantee its reproducibility and scalability.
Remote actions are achieved thanks to Ansible playbooks.
Jenkins
Jenkins is an open source automation server that permits the periodical build, test, deployment or other tasks that need to be automated such as code synchronisation.
The main CI job can be divided into different stages:
- Fetch source code from SEAPATH GitHub.
- Build Yocto images for the cluster machines
- Flash the cluster machines with the he newly created images (this is done thanks to a PXE mechanism) and reboot them
- Configure the cluster
- Deploy the VMs on the cluster
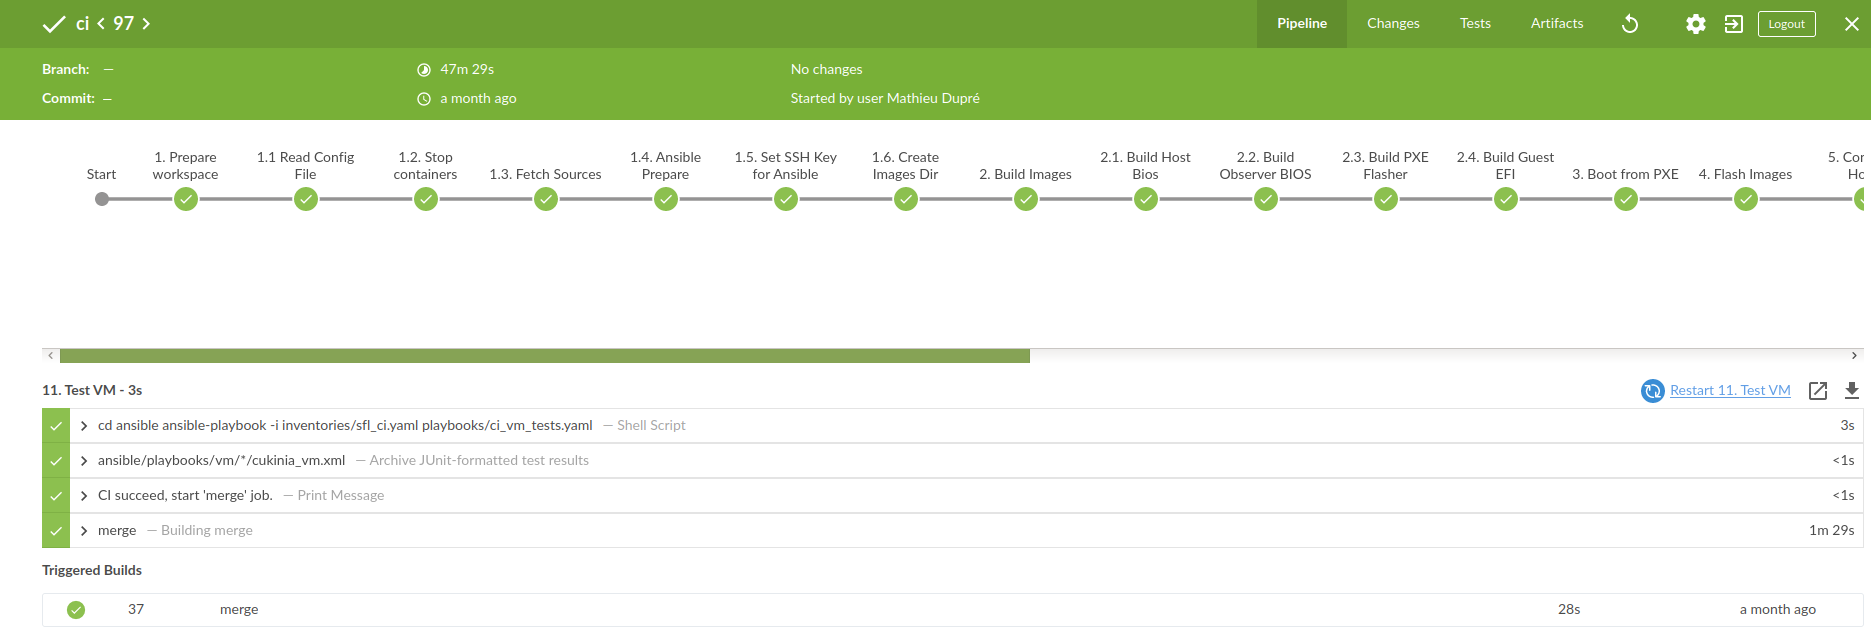
As shown on the diagram, each step of the chain is validated with the corresponding Cukinia tests and results collected on the CI Jenkins server.
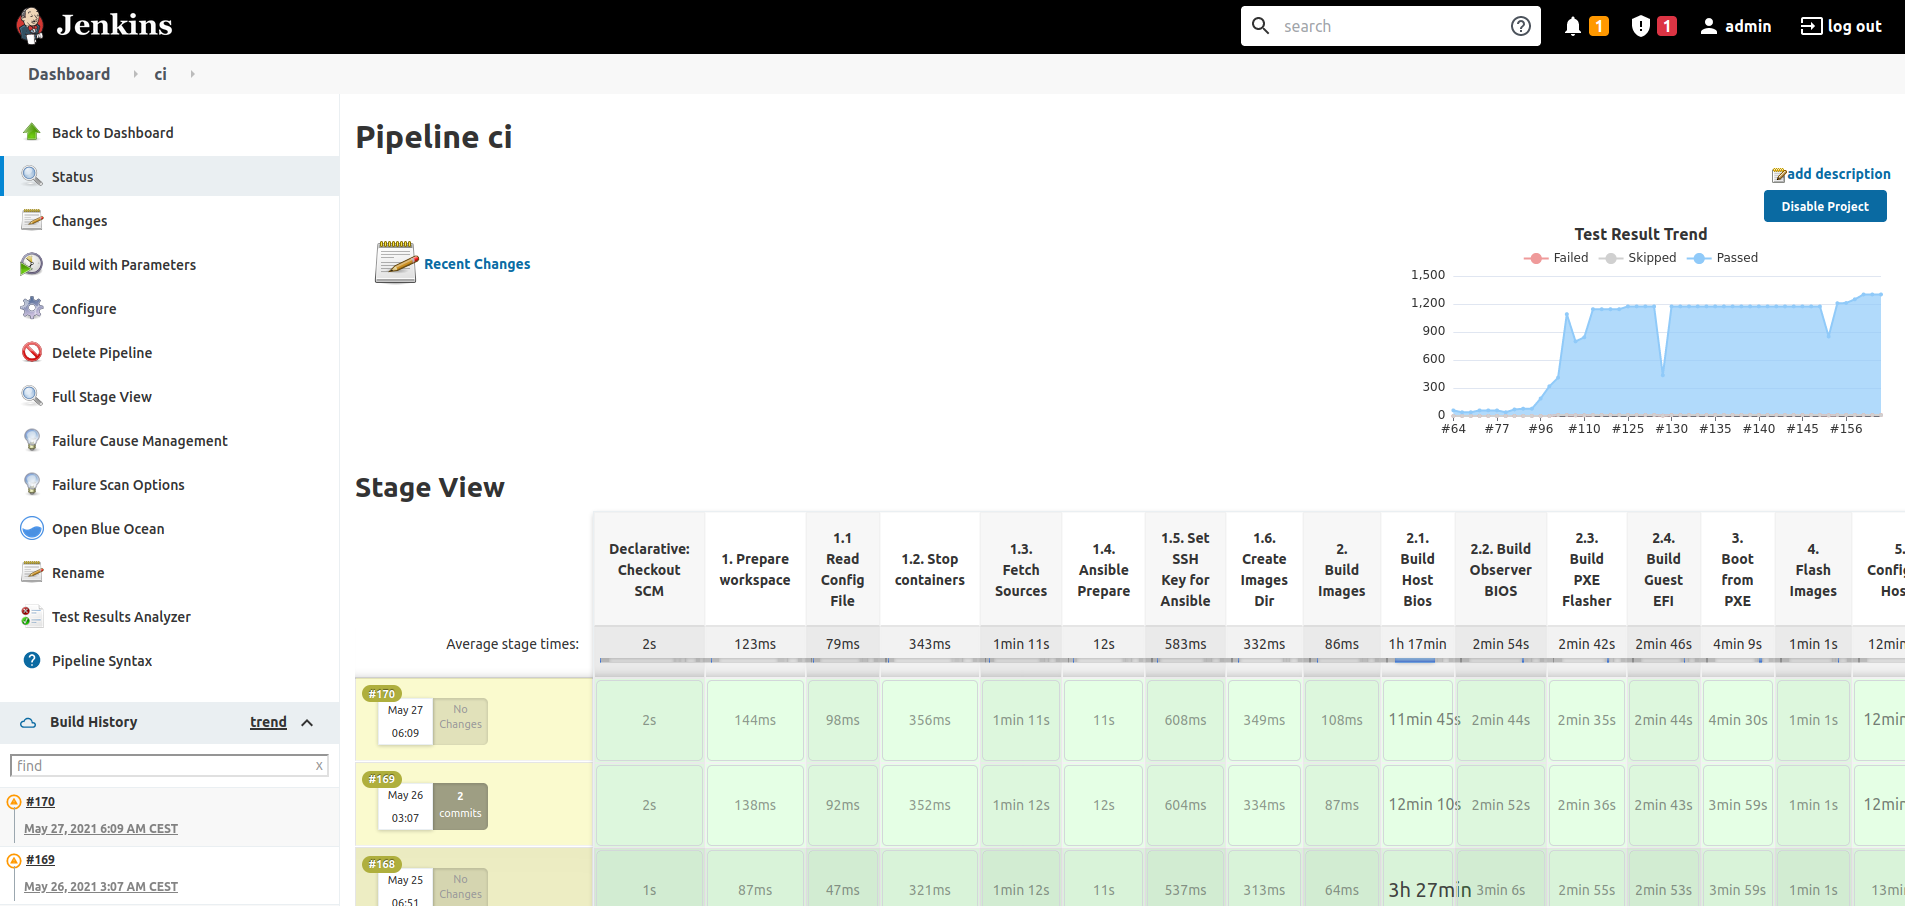
Jenkins UI
Jenkins offers a web UI to configure, manage and follow the progress of its jobs. As shown in the following picture, the stage view shows job information such the progress of the pipeline execution or the trend of the test results for the consecutive job executions.
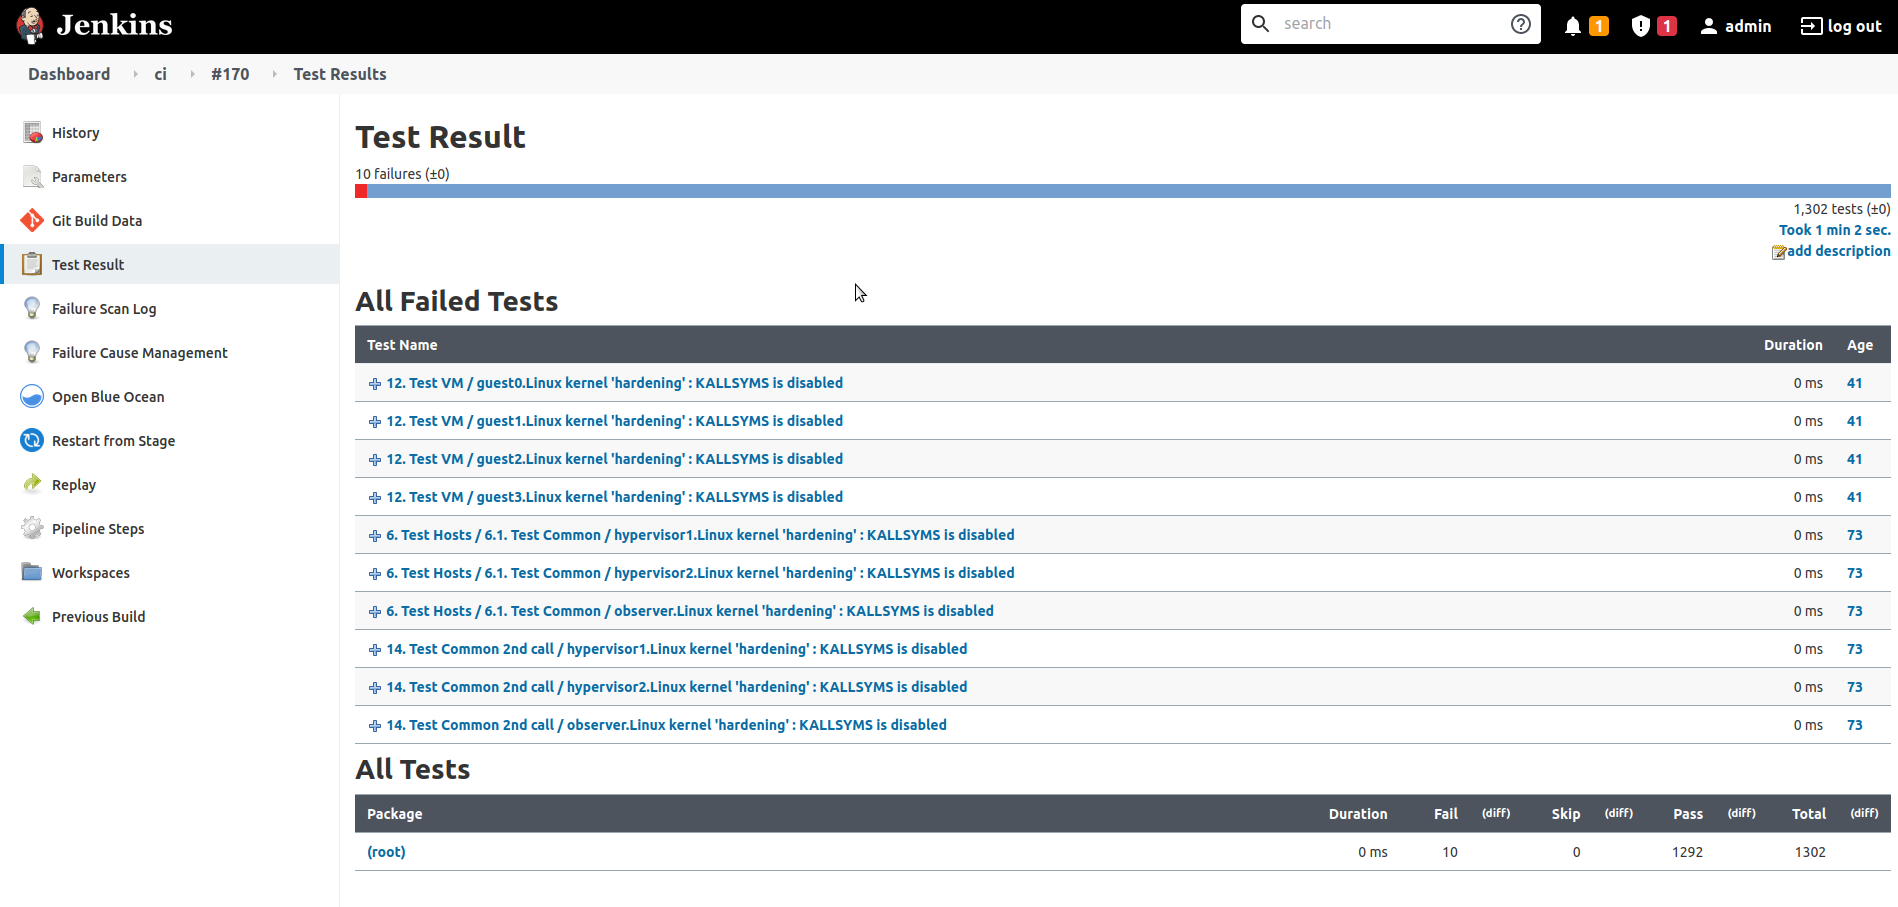
Analyse tests result
The results of the Cukinia tests run on the cluster are retrieved and displayed on the Jenkins UI.
Blue Ocean View
The Blue Ocean plugin offers an intuitive UI that simplifies the view and edition of a pipeline. It also permits re-running stages for a determined build.
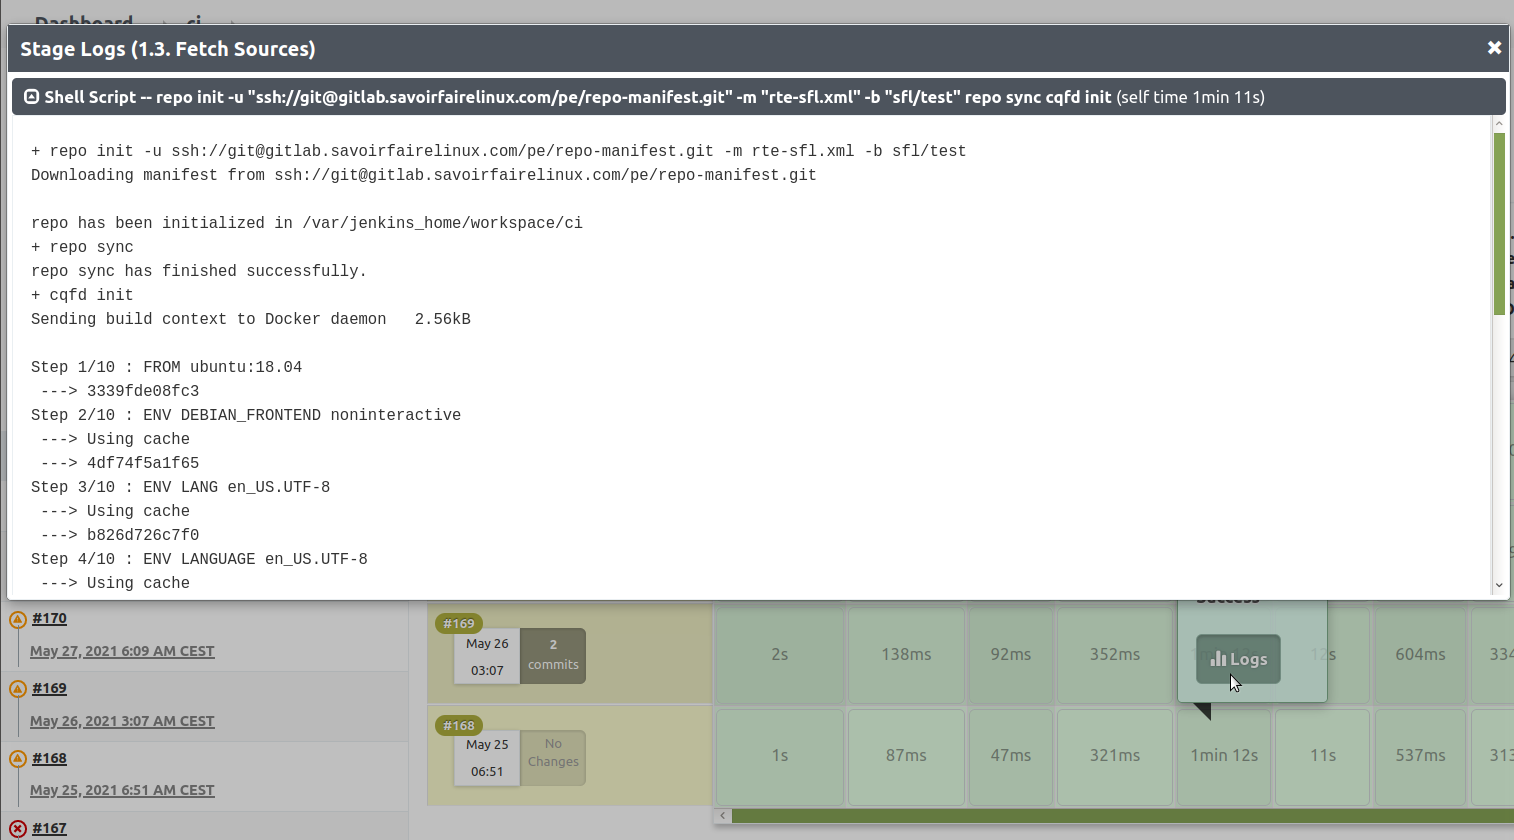
Log information
The complete output of a job execution can be obtained as well as the partial logs for each stage, as shown on the following picture.
RT test results
In order to validate the real-time requirements of the SEAPATH project, the CI also permits to execute cyclic tests on the VMs and retrieve the results.
Annex 1. cluster_vm module documentation
Synopsis
The cluster_vm Ansible module provides commands to manage virtual machines on a SEAPATH cluster.
Requirements
The below requirements are needed on the host that executes the module.
- python >= 3.7
- librbd
- libvirt
- vm_manager
Commands
The following table describes the commands provided by the module and their required arguments.
Command | Description | Required arguments |
create | Create and start a new VM. | name, xml, system_image |
remove | Remove a VM with its data. | name |
list_vms | List all the VMs defined on the cluster. | - |
start | Start or resume a VM. | name |
status | Get the status of a VM. | name |
stop | Gracefully stop of a VM. | name |
clone | Create a VM based on another VM. | name, src_name, xml |
enable | Enable a VM. | name |
disable | Disable a VM. | name |
list_snapshots | List all snapshots of a VM. | name |
create_snapshot | Create a snapshot of a VM. | name, snapshot_name |
remove_snapshot | Delete a snapshot of a VM. | name, snapshot_name |
purge_image | Delete all snapshots (or optionally the ones filtered by number or date) of a VM. | name |
rollback_snapshot | Restore the VM to a previous state using a snapshot. | name, snapshot_name |
list_metadata | List all metadata fields associated to a VM. | name |
get_metadata | Get the metadata value associated to a key for a given VM. | name, metadata_name |
Parameters
The following table describes the parameters used by the above commands.
Parameter | Type | Description | |
force | boolean (default: "no") | Force an action to be performed. Relevant if the command is create, clone, snapshot_create or stop. | |
metadata | dictionary | metadata in format key, value to store in the VM. This parameter is optional if the command is create or clone. metadata key must be composed of letters and numbers only. | |
metadata_name | string | Name of a metadata key. This option is required if the command is get_metadata. | |
name | string | Name of the guest VM being managed. This option is required unless the command is list_vms. name must be composed of letters and numbers only. aliases: guest | |
purge_date | dictionary | Date until the snapshots must be removed. This parameter is optional if command is purge. It cannot be used if purge_number is set. | |
date | string | Date in format YYYY-MM-DD. | |
| iso_8601 | string | Date and time represented in international ISO 8601 format. Time zone information is ignored. |
posix | integer | Number of milliseconds that have elapsed since 00,00,00, 1 January 1970. | |
time | string | Time in format HH:MM. | |
purge_number | integer | Number of snapshots to delete starting with the oldest. This option is optional if command is purge. Cannot be used if purge_date is set. | |
snapshot_name
| string
| Name of the snapshot. This option is required if the command is create_snapshot, remove_snapshot, rollback_snapshot. | |
src_name
| string | Name of the VM to clone. This option is required if the command is clone. | |
system_image | path | The VM system image disk in qcow2 format to import if the command is create. | |
xml | string
| Libvirt XML config used if command is create or clone. XML should not be a reference to a file but a raw XML content (obtained by lookup). | |
Examples
| Code Block | ||
|---|---|---|
| ||
# Create and start a VM
- name: Create and start guest0
  cluster_vm:
    name: guest0
    command: create
    system_image: my_disk.qcow2
    xml: "{{ lookup('file', 'my_vm_config.xml', errors='strict') }}"
    metadata:
      myMetadata: value
      anotherMetadata: value

# Remove a VM
- name: Remove guest0
  cluster_vm:
    name: guest0
    command: remove

# List VMs
- name: List all VMs
  cluster_vm:
  command: list_vms

# Start a VM
- name: Start guest0
  cluster_vm:
    name: guest0
    command: start

# Stop a VM
- name: Stop guest0
  cluster_vm:
    name: guest0
    command: stop# Force stopping (power off) a VM

- name: Stop guest0
  cluster_vm:
    name: guest0
    command: stop
    force: true

# Enable a VM
- name: Enable guest0
  cluster_vm:
    name: guest0
    command: enable

# Disable a VM
- name: Disable guest0
  cluster_vm:
    name: guest0
    command: disable

# Clone a VM
- name: Clone guest0 into guest1
  cluster_vm:
    name: guest1
    src_name: guest0
    command: clone
    xml: "{{ lookup('template', 'my_vm_config.xml', errors='strict') }}"

# Create a VM snapshot
- name: Create a snapshot of guest0
  cluster_vm:
    name: guest0
    command: create_snapshot
    snapshot_name: snap1

# Delete a VM snapshot
- name: Remove snap1 snapshot of guest0
  cluster_vm:
    name: guest0
    command: remove_snapshot
    snapshot_name: snap1

# Remove all snapshots
- name: Remove all snapshots of guest0
  cluster_vm:
    name: guest0
    command: purge_image

# Remove old snapshots
- name: Remove snapshots of guest0 older than January 24th 2021 8:00 AM
  cluster_vm:
    name: guest0
    command: purge_image
    purge_date:
      date: '2021-01-24'
      time: '08:00'

# Restore a VM from a snapshot
- name: Rollback guest0 into snapshot snap1
  cluster_vm:
    name: guest0
    command: rollback_snapshot
    snapshot_name: snap1

# List all snapshots stored in a VM
- name: List snapshots of guest0
  cluster_vm:
    name: guest0
    command: list_snapshots

# List metadata stored in a VM
- name: List guest0 metadata
  cluster_vm:
    name: guest0
    command: list_metadata

# Get the value of a metadata
- name: Get metadata test_metadata stored on guest0
  cluster_vm:
    name: guest0
    command: get_metadata
metadata_name: test_metadata |
Return Values
Common return values are documented on the following table. These fields are unique for the module.
Key | Type | Description |
list_metadata | list | The metadata list returned by the list_metadata command. Sample: ['name', 'xml', 'other metadata'] |
list_snapshots | list | The snapshot list returned by the list_snapshots command. Sample: ['snapshot1', 'snapshot2'] |
list_vms
| list | The list of VMs defined on the remote cluster, returned by the list_vms command. Sample: ['guest0', 'guest1'] |
metadata_value | string | The metadata returned by the get_metadata command. Sample: my metadata value |
status | string | The status of the VM (among Starting, Started, Paused, Stopped, Stopping, FAILED, Disabled and Undefined), returned by the status command. Sample: started |
Annex 2. Troubleshooting VM management
This section describes the unstable scenarios that can occur while executing Ansible commands on the cluster and which operations should be performed to recover a stable situation.
Ansible command is interrupted
The execution of a cluster_vm command can be interrupted for different reasons: crash on the hypervisor, network failure, manual stop of the operation… For the commands that modify the system, the interruption might result in an undesirable scenario, where a fix action will be required:
Command | How to fix |
create | Re-call the command with the force parameter set to true. |
clone | |
remove | Re-call the command. |
start | |
stop | |
create_snapshot | |
rollback_snapshot | |
remove_snapshot | |
enable | |
disable | |
purge_image | Note: purging snapshots according to number or date is not transactional. In case of interruption only a part of them might be removed. In this case, it is necessary to re-call the transaction. |
VM cannot be enabled
Enabling a VM on the Pacemaker cluster might fail if its XML configuration is invalid. Pacemaker will detect it and the VM will remain in a Stopped or Failed state, triggering a Timeout error. The commands that can enable a VM are:
Command | How to fix |
create | Remove the VM (*), fix the configuration and try creating it again. |
clone | |
rollback_snapshot | |
enable |
(*) Note: Calling the create or clone commands with the force parameter set to true will automatically remove the VM before its creation.
“VM is not on the cluster” error
If the VM is not enabled on the Pacemaker cluster there are three commands that will fail with the “VM is not on the cluster” error.
Command | Error message | How to fix |
start | VM is not on the cluster. | VM has to be created and enabled on the cluster. |
stop | ||
disable |
Unnecessary action / accessing nonexistent VM, snapshot or metadata
Creating a VM or snapshot that already exists or trying to access a nonexistent VM, snapshot or metadata will fail according to the following errors:
Command | Error message | How to fix |
create | VM already exists. | Choose a nonexistent VM name. |
clone | VM already exists. | Choose an nonexistent VM name. |
Error opening image. | Choose an existent VM name. | |
remove | VM does not exist. | Choose an existing VM name. |
list_snapshots | Error opening image. | Choose an existing VM name. |
create_snapshot | Error opening image. | Choose an existent VM name. |
Snapshot already exists. | Choose a nonexistent snapshot_name. | |
rollback_snapshot | Error opening image. | Choose an existent VM name. |
Snapshot does not exist on VM. | Choose an existent snapshot_name. | |
remove_snapshot | Error opening image. | Choose an existent VM name. |
Error checking if snapshot is protected. | Choose an existent snapshot_name. | |
purge_image | Error opening image. | Choose an existent VM name. |
get_metadata | Error opening image. | Choose an existent VM name. |
No metadata for image. | Choose an existent metadata_name. |
Invalid parameter name
Names for VMs, snapshots and metadata keys must only contain letters and numbers without spaces. Additionally, metadata has also reserved keys that cannot be used. In case of not following these rules, the commands create, clone and create_snapshot will fail with the error “Parameter must not contain spaces or special chars”.
Command | Error message | How to fix |
create | Parameters must not contain spaces or special chars. | Verify VM name and metadata keys. |
clone | Verify VM name and metadata keys (src_name and name cannot be the same). | |
create_snapshot | Verify snapshot_name. |
Draft Roadmap
| draw.io Diagram | ||||||||||||||||||||
|---|---|---|---|---|---|---|---|---|---|---|---|---|---|---|---|---|---|---|---|---|
|
Test proposal
The following document describes the test cases which must meet the following objectives:
- Ensuring the hardware meets the required performance for substation grade protection regarding latency, jitter, interoperability and reliability
- Ensuring the software platform meets the required performance for substation grade protection regarding latency, jitter, interoperability and reliability
- Provide system characteristics/benchmarks
- Provide indications on scalability
seapath.pptx
Documentation
The documentation is available directly on github.
Here is the main documentation to build a SEAPATH image: https://github.com/seapath/yocto-bsp/blob/master/README.adoc
Build machine
The Yocto project requires a powerful Linux based machine.
In order to build efficiently the SEAPATH project, we recommend not to use Virtual Machine. The Yocto project will ensure to multi-thread your build, so try to use a build machine with many CPU cores.
Here is a discussion on the Yocto Project mailing list: https://lists.yoctoproject.org/g/yocto/topic/72047879#48815
Here is for instance, a build configuration (~1500 euros) used:
| CPU | AMD RYZEN 9 3900X WRAITH PRISM LED RGB (3.8 GHZ / 4.6 GHZ) |
| Cooling | NOCTUA NH-U14S |
| MotherBoard | ASUS PRIME X570-P |
| Chipset | Intel C612 |
| PowerSupply | SEASONIC PRIME ULTRA 650 W GOLD |
| RAM | G.SKILL FLARE X SERIES 32 GO (2 X 16 GO) DDR4 3200 MHZ CL14 |
| SSD (SATA) | SAMSUNG SSD 860 EVO 500 GO |
| SSD (NVME) | CORSAIR FORCE MP600 1 TO |
| GPU | ASUS RADEON R7 240 R7240-2GD3-L |
| Case | PHANTEKS ENTHOO PRO |
Tips for building
- About 250GB is needed for building SEAPATH.
- A USB attached storage may be too slow to be practical for a successful build.
- Ensure you use an ext 2/ ext3 / ext4 filesystem for the build directory. NTFS will not work.
- Watch out with only manually deleting the /tmp/work directory. Instead delete the whole tmp directory.
- When deleting the tmp, it may take a very long time, and might cause
rm -rfto fail with an error.find . -deletewill work better, as it will not try to index all files before deleting them.
Test Bench/Reference hardware
This is the reference hardware for the Seapath project and supported out of the box. It might cost significant time to support other hardware (e.g. AMD processors).
Specification
| Parts | Specifications |
|---|---|
| Motherboard | ASMB‐823 |
| Chipset | Intel C612 |
| CPU | XEON 2.4G 35M 2011P 14CORE E5‐2680V4 |
| Memory | 2x 8G R‐DDR4‐2400 1.2V1GX8 HYX |
| Disk | SQF 2.5 SATA SSD 830 512G MLC (‐40~85°C) |
| NIC | INTEL I210 NIC 10/100/1000M PCIEx4 2PORT(G) |
Tests results
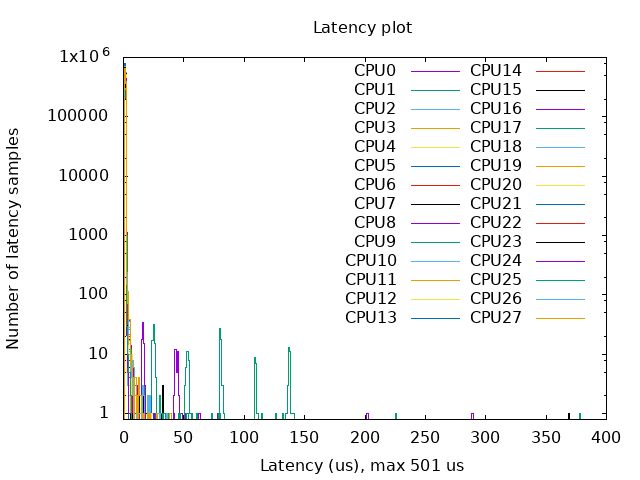
Real time
Tests
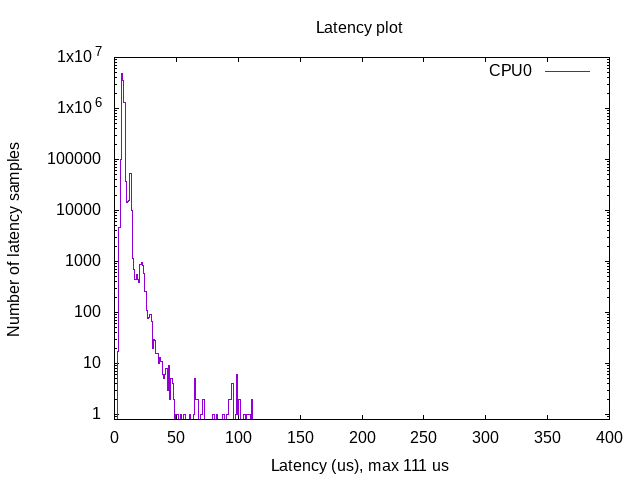
With the previous test bench hardware, a couple of tests were used.
We used cyclictest:
"Cyclictest accurately and repeatedly measures the difference between a thread's intended wake-up time and the time at which it actually wakes up in order to provide statistics about the system's latencies. It can measure latencies in real-time systems caused by the hardware, the firmware, and the operating system." (source: https://wiki.linuxfoundation.org/realtime/documentation/howto/tools/cyclictest/start).
The following arguments were provided:
| Code Block | ||
|---|---|---|
| ||
cyclictest -l100000000 -m -Sp90 -i200 -h400 -q >output |
This test is very long (~5 hours).
You can then plot the latency graph:
| Code Block | ||
|---|---|---|
| ||
./yocto-bsp/tools/gen_cyclic_test.sh -i output -n 28 -o output.png |
- output is the output file generated by cyclictest
- 28 match the amount of CPU used.
- output.png is the latency graph file.
Note:
- we used the same arguments than used by OSADL (https://www.osadl.org/Latency-plots.latency-plots.0.html)
- We created a script to plot the latency graph as done by OSADL
Results
Hypervisors
- With Kernel RT Full Preempt (CONFIG_PREEMPT_RT_FULL=y)
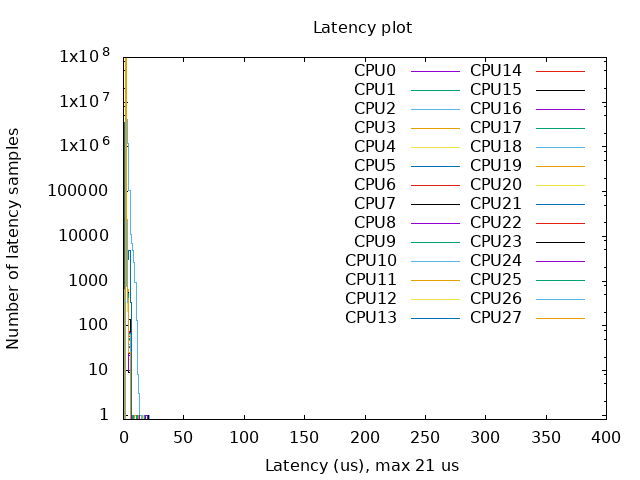
- Without Kernel RT Full Preempt (CONFIG_PREEMPT_NONE=y)
Virtual machines
All Yocto images include the ability to run guest Virtual Machines (VMs).
We used KVM and Qemu to run them. As we do not have any window manager on the host system,
VMs should be launched in console mode and their console output must be correctly set.
For testing purpose, we can run our Yocto image as a guest machine.
We do not use the .wic image which includes the Linux Kernel and the rootfs because
we need to set the console output.
We use two distinct files to modify the Linux Kernel command line:
- bzImage: the Linux Kernel image
- seapath-test-image-votp.ext4: the rte rootfs
Then run:
| Code Block | ||
|---|---|---|
| ||
qemu-system-x86_64 -accel kvm -kernel bzImage -m 4096 -hda seapath-test-image-votp.ext4 -nographic -append 'root=/dev/sda console=ttyS0' |
Docker
You can use docker check-config.sh to check that all necessary configurations of the host linux Kernel are set:
| Code Block | ||
|---|---|---|
| ||
info: reading kernel config from /proc/config.gz ...

Generally Necessary:
- cgroup hierarchy: properly mounted [/sys/fs/cgroup]
- CONFIG_NAMESPACES: enabled
- CONFIG_NET_NS: enabled
- CONFIG_PID_NS: enabled
- CONFIG_IPC_NS: enabled
- CONFIG_UTS_NS: enabled
- CONFIG_CGROUPS: enabled
- CONFIG_CGROUP_CPUACCT: enabled
- CONFIG_CGROUP_DEVICE: enabled
- CONFIG_CGROUP_FREEZER: enabled
- CONFIG_CGROUP_SCHED: enabled
- CONFIG_CPUSETS: enabled
- CONFIG_MEMCG: enabled
- CONFIG_KEYS: enabled
- CONFIG_VETH: enabled
- CONFIG_BRIDGE: enabled
- CONFIG_BRIDGE_NETFILTER: enabled
- CONFIG_NF_NAT_IPV4: enabled
- CONFIG_IP_NF_FILTER: enabled
- CONFIG_IP_NF_TARGET_MASQUERADE: enabled
- CONFIG_NETFILTER_XT_MATCH_ADDRTYPE: enabled
- CONFIG_NETFILTER_XT_MATCH_CONNTRACK: enabled
- CONFIG_NETFILTER_XT_MATCH_IPVS: enabled
- CONFIG_IP_NF_NAT: enabled
- CONFIG_NF_NAT: enabled
- CONFIG_NF_NAT_NEEDED: enabled
- CONFIG_POSIX_MQUEUE: enabled

Optional Features:
- CONFIG_USER_NS: enabled
- CONFIG_SECCOMP: enabled
- CONFIG_CGROUP_PIDS: enabled
- CONFIG_MEMCG_SWAP: enabled
- CONFIG_MEMCG_SWAP_ENABLED: enabled
    (cgroup swap accounting is currently enabled)
- CONFIG_LEGACY_VSYSCALL_EMULATE: enabled
- CONFIG_BLK_CGROUP: enabled
- CONFIG_BLK_DEV_THROTTLING: enabled
- CONFIG_IOSCHED_CFQ: enabled
- CONFIG_CFQ_GROUP_IOSCHED: enabled
- CONFIG_CGROUP_PERF: enabled
- CONFIG_CGROUP_HUGETLB: enabled
- CONFIG_NET_CLS_CGROUP: enabled
- CONFIG_CGROUP_NET_PRIO: enabled
- CONFIG_CFS_BANDWIDTH: enabled
- CONFIG_FAIR_GROUP_SCHED: enabled
- CONFIG_RT_GROUP_SCHED: missing
- CONFIG_IP_NF_TARGET_REDIRECT: enabled
- CONFIG_IP_VS: enabled
- CONFIG_IP_VS_NFCT: enabled
- CONFIG_IP_VS_PROTO_TCP: enabled
- CONFIG_IP_VS_PROTO_UDP: enabled
- CONFIG_IP_VS_RR: enabled
- CONFIG_EXT4_FS: enabled
- CONFIG_EXT4_FS_POSIX_ACL: enabled
- CONFIG_EXT4_FS_SECURITY: enabled
- Network Drivers:
  - "overlay":
    - CONFIG_VXLAN: enabled
      Optional (for encrypted networks):
      - CONFIG_CRYPTO: enabled
      - CONFIG_CRYPTO_AEAD: enabled
      - CONFIG_CRYPTO_GCM: missing
      - CONFIG_CRYPTO_SEQIV: missing
      - CONFIG_CRYPTO_GHASH: missing
      - CONFIG_XFRM: enabled
      - CONFIG_XFRM_USER: enabled
      - CONFIG_XFRM_ALGO: enabled
      - CONFIG_INET_ESP: missing
      - CONFIG_INET_XFRM_MODE_TRANSPORT: missing
  - "ipvlan":
    - CONFIG_IPVLAN: enabled
  - "macvlan":
    - CONFIG_MACVLAN: enabled
    - CONFIG_DUMMY: missing
  - "ftp,tftp client in container":
    - CONFIG_NF_NAT_FTP: enabled
    - CONFIG_NF_CONNTRACK_FTP: enabled
    - CONFIG_NF_NAT_TFTP: missing
    - CONFIG_NF_CONNTRACK_TFTP: missing
- Storage Drivers:
  - "aufs":
    - CONFIG_AUFS_FS: missing
  - "btrfs":
    - CONFIG_BTRFS_FS: missing
    - CONFIG_BTRFS_FS_POSIX_ACL: missing
  - "devicemapper":
    - CONFIG_BLK_DEV_DM: enabled
    - CONFIG_DM_THIN_PROVISIONING: missing
  - "overlay":
    - CONFIG_OVERLAY_FS: missing
  - "zfs":
    - /dev/zfs: missing
    - zfs command: missing
    - zpool command: missing

Limits:
- /proc/sys/kernel/keys/root_maxkeys: 1000000 |
Contribution process
- Create a personal fork of the project on Github
- Clone the fork on your local machine
- Make sure to pull upstream changes into your local repository
- Implement/fix your feature, comment your code if needed
- Follow the code style of the project, including indentation
- Run tests on the hardware you want to install the distribution and ensure that no regression are seen (ex: cukinia)
- Provide the hardware specification
- Write or adapt tests as needed
- Add or change the documentation as needed.
- Squash intermediary commits (fixes, WIP, …) with git's interactive rebase.
- Make sure to split your commit
- Each commit should only add one feature
- Use two separate commits when adding a package and enabling it
- Make sure that your commit message is consistent with the git history
- Prefix the commit title by the area touch
- ex: images/seapath-host-common.inc: add STONITH plugins
- Separate subject from body with a blank line
- Limit the subject line to 50 characters
- Use the imperative mood in the subject line
- Wrap the body at 72 characters
- Use the body to explain what and why vs. how
More details can be found there.
- Sign off your commit
- Push your branch to your fork on Github
- From your fork open a pull request
Code of conduct
the code of conduct is available here